Wednesday, March 22, 2023

Fisherman's Pie


Lent is not quite over, so there's still time to enjoy some good seafood recipes. Also, where I live, winter is not quite over (ahem) so there is still time for good comfort food. This dish checks both boxes.


You don't have to be observant of Lent in order to enjoy this dish. You just have to like good food! 


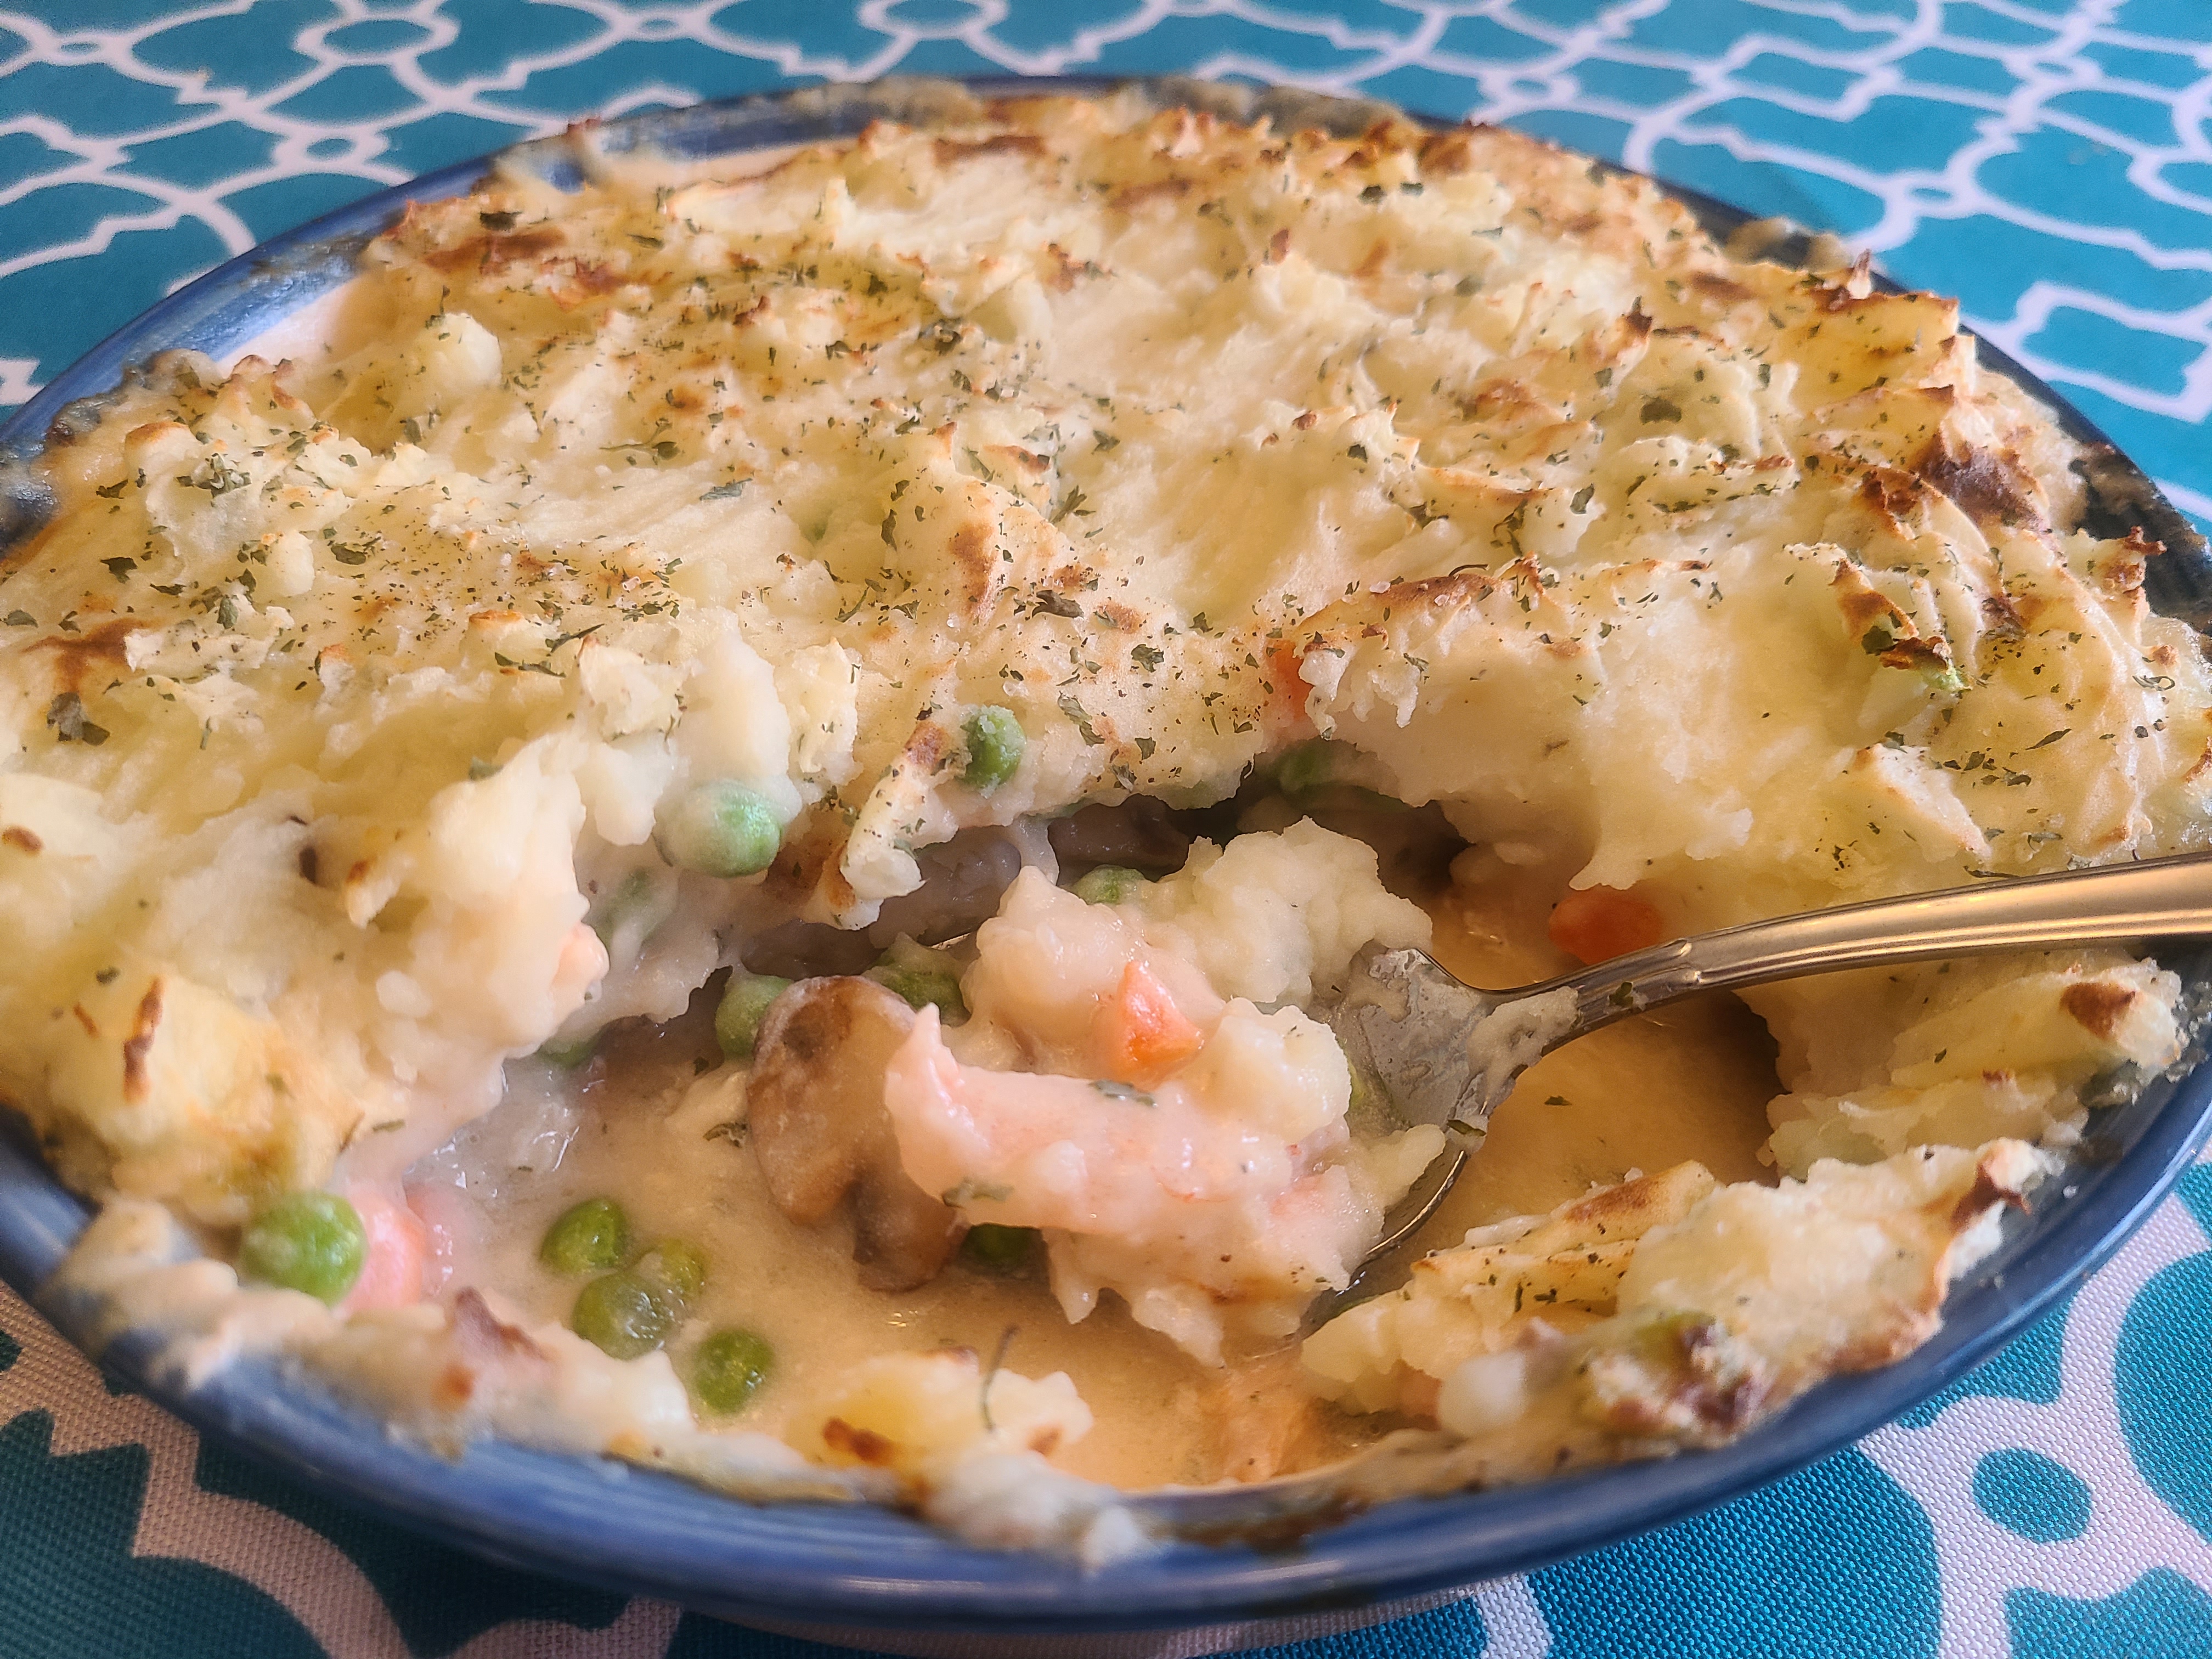
There are several variations of this Irish dish (I'm just a week late for St. Patrick's Day!) and I combined what I loved about several to make my own version. I like using two different kinds of fish, plus shrimp, and I also like adding the traditional pot pie vegetables. Plus mushrooms. Mushrooms make everything better.


There are also different ways of preparation. I really liked poaching the fish in wine; I thought it added a tremendous depth of flavor to the sauce. If you don't like to cook with wine, or you don't want to open a bottle just for this 2/3 cup, you could 1) invite me over or 2) poach the fish in milk. 


Either way, you'll use the liquid to make a delicious sauce that will go over the fish, 


but under the potatoes!


This recipe has quite a few steps, but it's not difficult. You can do most of it while the potatoes cook, and then it comes together quickly at the end. It's a great meal to make on a Saturday or Sunday afternoon when you can spend a little more time in the kitchen. 

We enjoyed this with a hearty green salad, and crusty bread would be delicious as well. We also loved the leftovers the next day - it seemed like the flavors melded and deepened. Yum! 


Fisherman's Pie

1/2 pound cod filets
1/2 pound salmon filets
2/3 cup dry white wine
1 Tbsp. parsley
4 ounces sliced white button mushrooms
4 Tbsp. butter, divided
2 Tbsp. flour
1/3 cup half and half
1/2 pound peeled and deveined raw large shrimp
3/4 cup frozen peas and carrots
1 1/2 pounds potatoes, either Russet or Yukon gold, peeled and cut into chunks

Cook the potatoes in boiling water for 15 to 20 minutes, until tender. Drain and mash the potatoes with a potato masher. Add a tablespoon of the butter, a splash of half and half, and continue to mash until smooth. Season with salt and pepper to taste. 

While the potatoes cook, generously season the cod and salmon filets with salt and pepper and place them in an even layer in the bottom of a 1 1/2 quart casserole dish. Pour the wine over the fish and sprinkle with parsley. Cover the dish with foil and bake at 350 for 15 minutes. 

Meanwhile, in a skillet, heat 1 tablespoon of butter over medium heat. Add the mushrooms, and cook for about 5 minutes, stirring pretty regularly. Remove to a bowl or plate. In the same skillet, melt 2 tablespoons of the butter. As it just begins to brown, add the flour. Cook, stirring, about 2 minutes. Reduce heat to low. 

Remove the baking pan with the fish from the oven, and use a slotted spoon to move the fish filets to a cutting board. Pour the liquid from the baking dish into the skillet, and whisk until the smooth. Bring the heat up to medium, and whisk constantly until the mixture boils. Add the half and half and season with salt and pepper. Remove from the heat. Stir in the frozen vegetables. 

Cut the fish into chunks, and place them back into the casserole dish. Top with the cooked mushrooms, and then the shrimp. 

Pour the sauce over the mixture in the pan and then smooth the mashed potatoes over the top. Sprinkle with additional parsley if you like. You can also rake a fork through the potatoes if you want to make a fancy design!

Bake at 425 for 15 minutes, then broil for 3-4 minutes until the potatoes are brown on top. Watch closely so potatoes do not burn.  Makes 4-5 servings.

Tuesday, March 14, 2023

Mushroom and Goat Cheese Phyllo "Purses"


So here's the best recipe I have for you for St. Patrick's Day. It's the closest thematic thing I had in my recent repertoire... so you just have to change the name - don't they SORT OF resemble pots of gold at the end of the rainbow? Come on, use your imagination. 


Even if you don't think they look like pots of gold, you could imagine CARRYING all your gold in these adorable phyllo "purses." There, that's it. Since you're a leprechaun, you'll carry all your gold in these delicious mushroom and goat cheese filled phyllo purses. It won't even matter that all your gold gets coated in mushrooms and goat cheese. You won't care. You will probably care that you can't stop eating your purse...then what are you going to do with the gold?

Oh my, I think we've gotten a little carried away here.

Really, all you need to know is that these are a super delicious appetizer that tastes and looks REALLY impressive. And they're not difficult.


Working with phyllo dough can be a little putsy - the sheets don't often come apart easy (I had to just throw away a couple) and you have to keep the sheets damp, and use lots of butter (that's a downside?) but it will be worth it. 

Be sure to either thaw your pastry sheets in the fridge overnight, or on the counter for a few hours. If you're thawing them on the counter, keep them covered with a slightly damp dishcloth to be sure they don't dry out. When it's time to make these, carefully unroll the bundle - it's ok if a few have broken and you have to throw them out; you'll have plenty!

You'll work with one sheet at a time, brushing it with butter, until you have three sheets stacked on top of one another, then you'll cut that into six pieces. You'll mound some mushroom mix in the middle and top with goat cheese, 


then bring up the sides and squinch together at the top to make a parcel or purse. Another brush with butter, and into the oven they go!


After baking, they are a crispy golden brown, and that outer shell is a wonderful complement to the creamy goat cheese, and the mushroom/shallot mixture. You can even make these ahead of time and then reheat for a few minutes in the oven, and they'll be just like new! 


You will have A LOT of phyllo sheets leftover, so just throw them in the freezer and start googling other recipes you can make - spanakopita bites, for one... 


Mushroom and Goat Cheese Phyllo Purses

1 Tbsp. olive oil
1 shallot, finely chopped
8 oz. mushrooms, chopped
3-4 oz. goat cheese, plain or herbed, crumbled
6 sheets phyllo pastry
6 Tbsp. butter, melted

Heat the olive oil in a skillet over medium high heat, and add the mushrooms and shallot. Cook, stirring occasionally, until the shallot is softened and mushrooms are not releasing moisture, about 7-10 minutes. Allow this mixture to cool completely. 

Place one phyllo sheet on a large cutting board. Brush with melted butter. Place another sheet on top and brush that one with the melted butter. Add a third, and repeat with the butter! Now you have 3 sheets high. Cut this into 6 equal squares.

Repeat the process with three more sheets so that you have 12 squares total.

Place about 1 1/2 tablespoons of the mushroom filling in the middle of each square and top with crumbled goat cheese. Bring the sides of the pastry up and squeeze together with your fingers to make a seal - it should look like a little purse or money sack...

Place each parcel on a baking sheet and brush with more melted butter. Bake at 375 for 25 minutes. Serve warm.

You can also bake these ahead of time and reheat at 350 for 5 minutes when it's time to serve. Makes 4-6 appetizer servings.


Wednesday, March 8, 2023

Sourdough Banana Bread


Our teenager recently proclaimed, "I think I could eat this banana bread every day of my life." That's a pretty solid endorsement. And I could agree, and happily. This banana bread is SO good. 


I have found myself thankful that I have a sourdough starter, not to make sourdough bread, but just to make this banana bread. And true confessions: I make this banana bread probably 5 or 6 times to every time I make sourdough bread. You don't even need to get out the mixer; a good wooden spoon and some arm muscle will do the job just fine!


This bread can use sourdough discard or freshly fed starter, so it's easy to make it whenever the mood strikes. I buy bananas for the sole purpose of making this bread. Bananas that are ripe can be frozen, and frozen bananas can be easily thawed, either on the counter or in the microwave, to make this batter.


If you don't have a sourdough starter, you can try to get one of your friends to give you some, or you can make your own.  However you get it, make sure you use it to make this awesome banana bread. You and your family will be so happy you did. 


Sourdough Banana Bread

1 1/2 cups overripe mashed bananas, about 3 medium bananas
1/2 cup sourdough starter (fed or discard)
1/2 cup vegetable oil
1/2 cup sugar
1/2 cup brown sugar
2 eggs
1 tsp. vanilla
1 3/4 cup flour
1 tsp. baking soda
1 tsp. baking powder
3/4 tsp. salt
1/2 tsp. cinnamon

In a large mixing bowl or batter bowl, stir together the mashed bananas, sourdough starter, oil, sugar, and brown sugar until well combined. Add eggs and vanilla and mix again.

Add the flour, baking soda, baking powder, salt, and cinnamon and stir together just until no dry streaks remain. 

Pour batter into a greased 9x5 loaf pan and bake at 350 for 50-60 minutes or until a toothpick comes out clean. 

Place the pan on a wire rack and cool for about 20 minutes. Then carefully remove from the pan and place the bread on the rack to cool completely. 


Recipe Source: Mel's Kitchen Cafe


Wednesday, February 15, 2023

Sesame Chicken and Snow Peas


Here is a great recipe for a weeknight dinner that fits my trifecta requirements: fast, easy, delicious. 


In fact, this is probably faster than making a trip to the neighborhood take out place; and it's a lot better for you. It's so fast that you need to get the rice cooking before you start the stir fry. And it's versatile - the original recipe called for broccoli but I changed it up to snow peas and we loved it. It would be great with broccoli, or bok choy, or any good stir fry vegetable. You could add onions, mushrooms, peppers - whatever you have languishing in the fridge.


The chicken and veggies get coated with a delicious semi-homemade sauce (you do need hoisin sauce from a jar). Don't overcook the veggies - you want a nice crunchy contrast to the chicken.

So get creative with your veggies choices, or don't, but add this to your dinner plans soon and receive the hearty compliments with humility. Ha!


Sesame Chicken and Snow Peas

1 Tbsp. olive oil
Tbsp. sesame oil
1 1/4 pounds boneless skinless chicken breast, diced into bite-sized pieces
1 1/2 tsp. cornstarch
1 1/2 tsp. cold water
1/4 cup brown sugar
1/4 cup soy sauce
2 Tbsp. honey
Tbsp. hoisin sauce
2 Tbsp. chili garlic sauce, or to taste
2 tsp. ground ginger
5 cups broccoli florets/snow peas/snap peas/bok choy
1 Tbsp. sesame seeds

Heat the olive and sesame oils in a large skillet over medium-high heat, then add the chicken and cook, stirring frequently, for about 4 minutes, or until chicken is nearly cooked through.

Combine the cornstarch and water in a small bowl, and stir to dissolve; set aside.

In a medium saucepan, combine the brown sugar, soy sauce, honey, hoisin sauce, chili garlic sauce, and ginger; stir to combine, and bring to a boil over medium heat. Allow mixture to bubble gently for 1 minute. After the mixture is boiling, add the cornstarch slurry, whisk to combine, and allow the sauce to boil and thicken for 2 to 3 minutes; whisking nearly constantly.

Push the chicken to one side of the skillet, add the vegetables to the other side, evenly pour the sauce over the chicken and vegetables, and gently stir to combine and coat evenly.

Cover the skillet and cook for about 5 minutes, or until vegetables are as crisp-tender as desired.

Sprinkle with the sesame seeds, and serve immediately.

Recipe Source: Adapted from Averie Cooks

Wednesday, February 8, 2023

Italian Love Cake


It's already February 8 and this is the first new recipe of 2023. Better late than never, I guess. And what could be better then a perfect recipe for Valentine's Day!?! I actually made this cake for a birthday, but since it's called LOVE cake and all, I thought it might inspire some of you to make a special dessert next week. 

Truth is, this is a special dessert no matter when you make it. It's super rich and chocolatey, and sort of cheesecakey (but note that my kids who don't "like" cheesecake ate this up without complaint, and with great praise!). The ricotta layer is really less like cheesecake and more like a creamy, solid base for the chocolate to rest on. (!) 


This cake is one of those fun ones that reverses layers in the oven. You make the chocolate layer first and pour it in the pan (don't bake yet!) then add the ricotta layer on top. The ricotta is heavier, so it sinks to the bottom while it bakes.

The cake is topped with a light and creamy pudding/cool whip frosting which is a great complement to the rich cake. This makes enough cake for a crowd, but the leftovers also keep really well in the fridge -- in fact, you'll want to plan ahead a bit as the cake is best after it has set in the fridge at least overnight before you serve it.

So get ready to show your love through this delicious cake - next week or some other random day. There's never a bad day to show love, or to eat cake.


Italian Love Cake
1 package chocolate or devil's food cake mix, plus ingredients to make cake 
2 pounds ricotta cheese
4 eggs
3/4 cup sugar
1 tsp. vanilla
1 (3.9 oz) package instant chocolate pudding
1 cup milk
16 oz. whipped topping, like Cool Whip, thawed

In a mixing bowl, combine the cake mix and the ingredients to make the cake as directed on the box (usually 3 eggs, oil and water). Stir well until the mix and ingredients are fully incorporated. Spread the batter into a greased 9x13 cake pan.

In another large bowl, use an electric mixer to beat the ricotta, eggs, and sugar together until creamy. Add the vanilla and mix well. Carefully pour the ricotta mixture over the chocolate cake mixture in the pan.

Bake at 350 for one hour.

Remove from the oven and place the cake pan on a wire rack to cool completely. Once it's cooled, you can frost, or you can refrigerate. The cake is best if it sits for at least a day before serving.

For the frosting, combine the pudding and milk in a medium bowl and whisk until thick and smooth. Carefully fold in the
 whipped topping. Spread on top of the cake, and refrigerate until serving. 

Recipe Source: The Seasoned Mom

Thursday, December 29, 2022

Best Recipes of 2022


I always look forward to this post at the end of the calendar year, but I also sort of dread it. I love looking back at all the recipes I tried this year, but it's SO HARD to narrow it down to eight! 

However, you know that if I went to all this trouble, these eight are really, really fantastic. There's no recipe that makes it to the blog that I wouldn't make again and again, but these eight are the real stand outs. They each have a significant WOW factor and are ones that I couldn't not include in my list of favorites. 

I hope you'll add a few of these to your "Make in 2023" list. (2023, what on earth???) And when you make these, please let me know what you think!

Here they are, linked to the original post, in no specific order.


Sourdough Waffles


Turtle Thumbprints


Red Curry Ramen with Pork


Bailey's Brownies


Korean Beef Sloppy Joes


Mini Meringues with Lemon Curd


Spinach Stuffed Chicken


Spinach and Artichoke Stuffed Bread


Monday, December 19, 2022

Cranberry Orange Shortbread Cookies


It's Christmas week! There's still time to make some goodies, and if you live in the Upper Midwest, you may find yourself housebound this week due to the frigid temps coming in. Brrr!!!! Perfect for turning on the oven and doing some baking.


Back to cookies. These little shortbread cookies are SO easy. And so good. 


Just 6 ingredients come together (and quickly) and then you refrigerate the dough for a few hours or overnight. Then they're read to slice and bake!

They aren't too sweet, so they are a nice contrast to other cookies that may be in your arsenal... and they're so pretty with the orange and red. 


Enjoy! And Merry Christmas!


Cranberry Orange Shortbread Cookies

1 cup unsalted butter, softened
1/2 cup sugar
zest of one orange or tangerine 
1 heaping cup fresh cranberries
2 cups flour
1 tsp. vanilla 

Finely chop the cranberries and set aside. In a food processor, cream the butter, sugar, and zest together until well combined. Add the flour and extract, and pulse about 10 times, then run the machine briefly, just until the dough comes together into a lump or lumps. Add the cranberries and pulse just until they are distributed, but don't over process - you don't want pink dough! (or maybe you do, but you do want cranberry chunks - not sauce!) If you don't have a food processor, you can still do the above with a mixer. 

Turn the dough out onto a lightly floured board and bring together with your hands until it is no longer crumbly. Form the dough into a 10-12 inch log. The longer your log the smaller your cookies will be. Wrap the log in plastic, using the plastic to smooth out the dough and help form your log. Twist the ends tight to seal.

Chill the dough for at least 3 hours, or overnight. 

Slice the dough into 1/3 inch slices and place on a parchment-lined cookie sheet, two inches apart. Bake at 350 for 10-12 minutes, or slightly longer if you like your cookies crisper. They will be pale on top and just turning golden on the bottom. Cool for a couple of minutes on the baking sheets and then carefully transfer them to a cooling rack. 
Powered by Blogger.