Monday, March 29, 2021

Cadbury Cookies


I know I'm in the minority here, but chocolate is not my favorite go-to candy. Give me gummi bears, jelly beans, peach rings, licorice etc. and I am one happy camper. However, there's one significant exception. I LOVE Cadbury mini eggs. These are the little eggs that have a crisp shell and an absolutely delicious chocolate inside. They are SO good. And very addicting. I usually limit myself to one bag each Easter season. (I should probably start imposing the same limit on jelly beans, but that's a different story.)                                                                 


So when I saw that you could take these amazing candies and put them in cookies, I was excited to try it. I especially love how festive the cookies look with the beautiful pastel shells on top. Be sure to reserve some of your crushed candies to put on top so you can get the same effect!


These cookies have an amazing fudgy texture. When you combine that with the smooth and crispy chocolate candies, it is cookie nirvana. Make all the little chicks and bunnies in your world happy with these amazing treats. Happy Easter!


Cadbury Cookies

1/2 cup shortening
1/2 cup butter
1 cup brown sugar
1 cup sugar
2 eggs
1 1/2 tsp. vanilla
1 tsp. baking powder
1 tsp. baking soda
1/2 tsp. salt
2 1/2 cups flour
6 Tbsp. cocoa
1 - 10 oz. bag Cadbury mini eggs

Using an electric mixer, cream together the shortening, butter, brown sugar and sugar. Add in eggs one at a time, beating well after each addition. Beat in the vanilla.

In a separate bowl, whisk together the flour, baking powder, baking soda, salt and cocoa. Gradually add to the butter mixture and beat until all the flour is combined.

Place the candies in a large zip top bag, and mash up with a hammer or a rolling pin. Reserve some of the candies for putting on top, and mix the rest in to the batter with a wooden spoon.

Drop spoonfuls of dough onto parchment or silpat lined baking sheets. Top with the remaining candies, shell side up so you can see the colors. 

Bake at 350 for 8-10 minutes. Let cool on the pan for a few minutes, then remove to a wire rack to cool completely. 

Monday, March 22, 2021

Thai Sweet Chili Salmon


You can be sure that if a recipe includes Thai Sweet Chili in the title, I'm going to take a look. I LOVE Thai Sweet Chili Sauce. I use it as a dipping sauce for eggrolls and crab rangoons and potstickers, in marinades for chicken and more chicken, in banh mi tacos, and now for this delicious salmon. The sauce, combined with ginger and soy, creates a wonderful treatment for salmon.


To get the ultimate flavor from this fish, you do need to let it marinate for an hour or so. But after that, it's a snap. It sits under the broiler for a few minutes and then voila, it's done, and dinner is ready. You can make a quick salad or steam some veggies, but if you're making rice or something like that, you'll need to start that ahead of time. This is just that fast!

Now that the weather is warming up, it's a great time to add quick and healthy (and satisfying!) lighter meals to the rotation. This Thai Sweet Chili Salmon fits the bill perfectly. I hope you enjoy it as much as we do. 


Thai Sweet Chili Salmon

  • 1-1/2 pounds (or four 6-ounce pieces) salmon, skin on or off
  • 6 tablespoons Thai Sweet Chili Sauce 
  • 3 Tbsp. soy sauce 
  • 1 Tbsp. peeled and finely grated fresh ginger
  • 2 green onions, green parts only, finely sliced, optional

  1. Combine the sweet chili sauce, soy sauce and ginger in a liquid measuring cup. Place salmon fillets, skin side up, in a shallow dish and pour all but 1/4 cup of the marinade over the fish. Turn it over to coat it all with the marinade, but leave it in the sauce flesh side down. Let the fish marinate for 1 hour in refrigerator.
  2. Line a rimmed baking sheet with aluminum foil and spray with nonstick cooking spray. Transfer the salmon fillets to the prepared baking sheet, skin side down, and drizzle a bit of the marinade over top. 
  3. Broil the salmon for 6-10 minutes, or until browned in spots and almost opaque in the center. Transfer the salmon to a serving platter and pour the reserved sauce over top. Garnish with green onions if you like. Serves 4. 

    .

Tuesday, March 16, 2021

Chocolate Mint Cake


Tomorrow is St. Patrick's Day, the perfect time to make a delicious chocolate cake with a green, minty center. Actually this cake would also be perfect at Christmas, or Easter, or for a birthday, or for any day you need a delicious dessert.

Although there are several steps to make the different components of this cake, it is not difficult, and the end result is pretty impressive.


It's also not quite as heavy as other cakes, as one layer cake is split in half to create the layers, versus making two cakes. (If you want a more hearty cake, two layers would be a-ok!) 

May the luck of the Irish be with you (although I promise, you do not need luck to make this cake!), and may you enjoy many food items with green tomorrow! 


Chocolate Mint Cake

Cake:
1 cup flour
1/2 cup whole wheat flour
3/4 cup sugar
1/4 cup cocoa
1 tsp. baking soda
1/2 tsp. salt
1 cup water
1/3 cup canola oil
1 Tbsp. cider vinegar
1/2 tsp. almond extract
1/2 tsp. vanilla

Filling:
1/2 cup butter, softened
1 1/2 cups powdered sugar
1/4 tsp. mint extract
1/4 tsp. vanilla
1/4 tsp. salt
1-2 drops green food coloring
2 Tbsp. half and half or coconut milk

Glaze:
1/2 cup half and half or coconut milk
1 1/2 cups chocolate chips
pinch salt

For the cake: Whisk flour, whole-wheat flour, sugar, cocoa, baking soda and 1/2 teaspoon salt in a large bowl. Whisk water, oil, vinegar, almond extract and 1/2 teaspoon vanilla in a small bowl. Add the wet ingredients to the dry ingredients and stir until smooth. Pour the batter into a greased 9" cake pan.  Tap it lightly on the counter to remove any air bubbles.

Bake at 350 until a toothpick inserted in the center comes out with just a couple of crumbs attached, 25 to 30 minutes. Let cool in the pan on a wire rack for 10 minutes, then turn out onto the rack and let cool completely, about 45 minutes.

Meanwhile, to prepare filling: Beat butter on medium speed for 1 minute. Add powdered sugar, 1/2 cup at a time, until completely incorporated. Add mint extract and vanilla, then 1/4 teaspoon salt and food coloring. Add 2 tablespoons half-and-half (or coconut milk), and beat, scraping down the sides as necessary, until fluffy and light.

To prepare glaze: Microwave half-and-half (or coconut milk) in a microwave-safe bowl on High until hot, about 1 minute. Stir in chocolate chips until melted. Add salt and whisk until glossy. Let cool for 5 minutes.

To assemble cake: Using a serrated knife, cut the cooled cake in half horizontally. Place the bottom layer, cut-side up, on a serving plate. Spread with the filling and top with the other layer, cut-side down. Spread the glaze over the cake. Serves 12.

Recipe Source: Eating Well

Wednesday, March 10, 2021

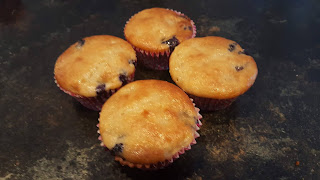
Banana Blueberry Muffins


Muffins make a pretty regular occurrence in our house, and banana muffins with chocolate chips are the most common. However, they're not my favorite; I just don't like chocolate in my breakfast food. So occasionally (when I want to be the eater of the muffins!) I mix it up and use blueberries instead.  I recently realized I had never posted this recipe. It is so good, and so easy, and you will wonder where banana blueberry muffins have been all your life.


I make these with yogurt instead of butter or oil; feel free to sub 6 Tbsp. butter or 1/3 cup oil if you prefer. You could also amp up the healthiness by using whole wheat flour. 


Be the breakfast hero in your house and make these muffins today!

Banana Blueberry Muffins

3/4 cup sugar
1 egg
1 - 6oz. container Greek yogurt (plain, vanilla or banana)
3 ripe bananas
1 1/2 cups flour
1 tsp. baking powder
1 tsp. baking soda
1/2 tsp. salt
1 cup blueberries

Combine sugar, egg and yogurt in a large bowl and mix with an electric mixer until smooth. Mash up the bananas with a fork, then add to the mixing bowl and beat until combined.

Add the flour, baking powder, baking soda and salt and mix just until no flour streaks remain. Carefully stir in blueberries by hand.

Transfer batter to 12 paper lined muffin cups. Bake at 375 for 20 minutes or until toothpick comes out clean. Cool completely on a wire rack.  Store in an airtight container on the counter for 2-3 days, or put in a freezer bag and store in freezer.

Monday, March 1, 2021

Roasted Butternut and Kale Salad with Goat Cheese


When I saw this recipe, I knew I would love it. And I wasn't wrong. This is an amazing salad. I'm a recent convert to kale (SO late to this party!) and I have been roasting it a lot with other vegetables, but have wanted to try it in a salad as well. This was the perfect one to try.


Just look at all that goodness! Roasted squash, goat cheese, pepitas (pumpkin seeds!) and craisins. Practically everything is better with goat cheese on it, so there's that. But then squash roasted with all kinds of wonderful spices? And craisins?? (Craisins were not in the original recipe, but this salad seemed to be screaming out for them.) (Also, am I the only one who automatically types craisings - cause when do you NOT put a "g" after an "in"????)


These amazing ingredients are then topped with a really delicious apricot preserves-based dressing. And lucky for you, the dressing makes enough so that you can use it on other salads in the next few weeks. 


The great thing about kale is that it is a hearty green, so even if it's dressed, it can withhold a day or two in the fridge. The benefit for YOU is that IF you happen to have leftovers of this salad, they are equally good the next day - not a gooey, soggy mess like regular salads. 

So, please, make this. It is AMAZING and wonderful and delicious and beautiful. 


Roasted Butternut and Kale Salad with Goat Cheese

Salad:
3 cups cubed butternut squash
1 Tbsp. olive oil
1/2 tsp. salt
1/2 tsp. pepper
1/2 tsp. cumin
1/2 tsp. paprika
1/2 tsp. chili powder
8 oz. chopped kale leaves
2 tsp. olive oil
2 ounces goat cheese, crumbled (plain or honey)
1/4 cup roasted pepitas
1/3 cup dried cranberries

Apricot Vinaigrette:
1/4 cup apple cider vinegar
3 Tbsp. apricot preserves
2 cloves garlic, minced
1/2 cup olive oil
1/4 tsp. salt
1/4 tsp. pepper
pinch red pepper flakes, crushed

In a large mixing bowl, toss the squash with the olive oil until all the pieces are coated. Add in the salt, pepper, cumin, paprika and chili powder, and stir again until all the pieces are coated. Transfer to a greased or parchment paper lined sheet pan, and roast at 425 for 20-25 minutes until the pieces are slightly carmelized.

Meanwhile, place the kale in a large mixing bowl, and drizzle with the 2 tsp. olive oil. Massage the kale with your fingers for a few minutes. Let the kale rest at least 5 minutes.

Make the dressing by combining the vinegar, preserved, garlic, salt, pepper, and red pepper flakes in a bowl or jar. Drizzle in the olive oil, whisking constantly. Taste, and adjust seasonings as necessary. (You will likely have quite a bit of dressing left over; it keeps in the fridge beautifully for a couple of weeks and is great on other salads.) 

When squash is done, sprinkle kale with the salt and pepper, then add in the goat cheese, pepitas and craisins. Add in the squash, drizzle with the dressing, then toss and serve.

Recipe Source: Adapted from How Sweet Eats
Powered by Blogger.