Tuesday, December 31, 2019

Most Popular Recipes of 2019

Today on the Countdown to 2020 (one more day!) it's time to look back at the most popular recipes on Cook with Sara in 2019. These were some of my favorites, too, so it was fun to see that the readers agree. I hope you'll try one or more in the New Year.

Soy and Honey Glazed Cod


Twice Baked Potatoes


Upside Down Shepherd's Pie


Check out these other bloggers, too!

You are invited to the Inlinkz link party!

Click here to enter

Sunday, December 29, 2019

Best Desserts of 2019

As we countdown to 2020, today is the day we take a look back at the best desserts of 2019. This category has unusually slim pickings this year - as I mentioned before, many of my new recipes this year were main dishes. But just because there are fewer desserts to choose from doesn't reflect on the quality or deliciousness of the desserts - these three in particular were amazing and will be repeated in years to come, I'm sure.

Peach Cobbler Bars


Caramel Apple Cheesecake Bars


Strawberry Rhubarb Cheesecake Bars


Check out these other bloggers for more great desserts:

You are invited to the Inlinkz link party!

Click here to enter

Saturday, December 28, 2019

Best Main Dishes of 2019

Today is Main Dish day on the Countdown to 2020. I have lots of these to choose from: 2019 was a great year for me for making new main dishes and posting them. These are a few of my favorites; you'll see more later in the Reader's Favorites category. All of these meals are fantastic options for any weekday. And they were all devoured by my family, which is the ultimate endorsement.

I hope you try a few in the New Year and let me know what you think!


Banh Mi Tacos


Cheesy Taco Pasta


Sweet Potato, Brussels Sprouts and Chicken Sausage Sheet Pan Dinner


Mango Chicken Curry


Check out other great main dishes from other bloggers here:

You are invited to the Inlinkz link party!

Click here to enter


Friday, December 27, 2019

Best Breakfasts of 2019

It's the annual countdown to 2020 hosted by Sarah at Fantastical Sharing! For the next several days, we'll look back over the best recipes from different categories on this blog. Today, it's breakfasts.

Now, this year was unusual for me. I didn't post as regularly, and I also posted mostly main dishes! So some of these categories will be a little thin. But it's still fun to revisit and remind myself of all the delicious things we ate this year.

So, my two favorite recipes for breakfast/brunch this year were:

Monte Cristo Breakfast Bake


Pumpkin Streusel Muffins


Check out all the other bloggers posting their favorite breakasts:

You are invited to the Inlinkz link party!

Click here to enter

Monday, December 23, 2019

Pear, Raspberry and Pistachio Salad with Poppyseed Dressing


It's pretty unusual for me not to be posting a cookie recipe or a holiday dessert on the Monday before Christmas. I've done a little baking, but honestly I'm not as into it as usual. And that's ok. Because we all need vegetables, too.


I made this salad last week when I had pears that needed o be used up. (Again, with the buying too much produce!) I loved the combination of the pears and raspberries with the tang of the poppyseed dressing. And the pistachios? Those salty wonders just took this right over the top.


This salad was a big hit with my family and would be a great addition to any holiday menu. I love that it's so beautiful on the plate, too. And when you eat this salad, you can justify eating even more cookies. So, that's a pretty good deal. Merry Christmas!

Pear, Raspberry and Pistachio Salad with Poppyseed Dressing

6 cups spring mix
1 cup raspberries
2 pears, thinly sliced
1/3 cup shelled pistachios
1/3 cup crumbled feta cheese

Creamy Poppyseed Dressing:
1/3 cup mayonnaise
1/4 cup milk
3 Tbsp. sugar
4 tsp. cider vinegar
2 tsp. poppy seeds

For the dressing, in a large measuring cup, whisk together the mayonnaise, milk, sugar, and vinegar until the sugar is dissolved. Stir in poppyseeds.

Place the spring mix in a large bowl and pour dressing over. Toss to coat all the greens. Divide the greens among 4-6 salad plates (depending on how big you want each salad to be!) and top with sliced pears, raspberries, feta and pistachios. Serve immediately. Serves 4-6.

Monday, December 16, 2019

Monte Cristo Breakfast Bake


As you're planning your Christmas or New Year's menu, I hope you'll consider this wonderful breakfast dish. The Monte Cristo sandwich is traditionally dipped into French Toast batter and fried, then topped with powdered sugar and served with cream cheese and jam. It is indulgent! In this casserole version, croissant sandwiches with the same traditional Monte Cristo fillings (ham, swiss, turkey) are baked in an egg "bath." A blackberry jam on the croissant adds the wonderful sweetness that often accompanies the sandwich.


I made this after Thanksgiving and used leftover turkey in place of deli slices. If you have leftover ham and turkey after Christmas, this would be a great, and unique, way to use those leftovers! Like all good breakfast casseroles, this one can be made the night before, making your morning easy. You can serve this with a fruit salad (we love this cranberry version!) and have a wonderful and filling breakfast or brunch.


Find more great ideas at Inspire Me, Hearth and Soul.


Monte Cristo Breakfast Bake

4 Tbsp. blackberry preserves
1 1/2 Tbsp. Dijon mustard
6 bakery croissants, split
6 slices Swiss cheese
12 thin slices Black Forest ham, (8-oz.)
12 thin slices turkey, (8-oz.)
5 eggs, lightly beaten
1 1/2 cups half-and-half

In a small bowl, combine the jam and mustard. Spread the mixture on the cut sides of each croissant. Layer the ham, turkey and cheese on the bottom halves of the croissants; top with the other half of the croissant. Place sandwiches in a single layer in a lightly greased 9x13 baking dish.

Whisk together eggs and half and half; pour over the sandwiches. Lightly press down the sandwiches into the egg mixture. Cover and refrigerate 2 hours or overnight.

Bake at 350, uncovered, for 20 minutes. Cover and bake for an additional 30 minutes or until eggs are lightly set. Serve immediately. Serves 6-8

Recipe Source: HyVee

Monday, December 9, 2019

Strawberry and White Chocolate Shortbread


I love rich, fancy, complex Christmas cookies just as much as the next person. But I also love a really simple, but equally delicious and satisfying, Christmas cookie. This cookie fits into the latter category. Super easy to whip up and bake, but beautiful on a plate, this is a lovely cookie with a contrast of tart dried strawberries and sweet white chocolate.


This cookie dough requires refrigeration before you slice and bake. You could certainly work to make these more perfectly round, but I sort of like shortbread in little square-ish shapes. Do what you like. But make them, in any case. They will be a big hit at any Christmas gathering, or just at your table with your morning coffee!


Strawberry and White Chocolate Shortbread

1 cup butter, softened
1/2 cup + 2 Tbsp. powdered sugar
1 tsp. vanilla extract
1/2 tsp. salt
2 cups flour
3/4 cup dried strawberries, finely chopped
2/3 cup white chocolate chips

Cream butter, sugar, vanilla and salt until smooth. With the mixer on low speed, gradually add flour. Mix until combined.

Stir in finely chopped dried strawberries and white chocolate.

Transfer the dough to a piece of parchment paper and roll into 2 inch diameter log. Gently press with your hands, and wrap tightly in parchment paper and refrigerate the log for 2 hours to firm.

Unwrap the log and using serrated knife cut into 1/3 inch thick slices. If the dough crumbles too much leave it at room temperature 5-8 mins then slice. If the slices lose their shape press back together with your fingers and place them onto a parchment-lined baking sheet with one inch of space between.

Bake at 325 for 15-20 minutes until the edges are lightly golden. Cool on baking sheets for 5 mins then transfer to a rack to cool completely.

Recipe Source: OMGChocolate Desserts

Monday, November 11, 2019

Pumpkin Streusel Muffins


It just wouldn't be fall without a new pumpkin recipe. In the past, we've enjoyed Pumpkin Gingerbread, Pumpkin and Raisin Muffins, Pumpkin Apple Spice Muffins, Pumpkin Spice Donuts, Pumpkin Waffles and even Pumpkin Ice Cream!


This list could be A LOT longer; I'll save the dessert links for another post! But today we're back in the breakfast/bread category with these delicious pumpkin streusel muffins. I adapted this recipe from a coffeecake; when bringing treats to the office, individual servings make things much more convenient.


These muffins are full of pumpkin goodness and all the delicious spices that go along with the flavors of fall. I especially liked the chopped pecans in the streusel. They're great for breakfast or a coffee break or an afternoon snack. I hope you enjoy them as much as we did. (And all my office mates!)


Pumpkin Streusel Muffins

Muffins:
1/2 cup butter, softened
1 1/2 cups sugar
1 can (15 oz.) pumpkin puree
3 eggs
2 1/2 cups flour
2 tsp. baking powder
1 Tbsp. cinnamon
1 1/2 tsp. ginger
1/2 tsp. nutmeg
1/2 tsp. salt
1/4 tsp. ground cloves

Streusel:
1/3 cup flour
1/3 cup sugar
1/3 cup brown sugar
1 tsp. cinnamon
4 Tbsp. butter, melted
2/3 cup chopped pecans


In a large mixing bowl, beat the butter and sugar until well blended. Add the pumpkin and eggs and mix until well combined.

In a separate bowl, combine the flour, baking powder, cinnamon, ginger, nutmeg, salt, and cloves. Whisk until spices are evenly distributed throughout.

Add the flour mixture to the pumpkin mixture. Mix with an electric mixer on medium speed until the mixture is thoroughly combined.

Divide the batter between 16 paper-lined muffin cups.

For the streusel, in a small bowl, mix the flour, sugar, brown sugar, cinnamon, melted butter, and pecans with a fork. Evenly sprinkle the topping over the batter in the muffin cups.

Bake at 350 for 20-25 minutes or until a toothpick inserted near the center tests clean. Cool completely on a wire rack.

Recipe Source: Adapted from a coffeecake at Love Bakes Good Cakes

Monday, November 4, 2019

Caramel Apple Cheesecake Bars


This is a wonderful fall dessert that would make a great addition to any holiday table. Alternatively, it would make a great addition to any meal, any day of the week. Shortbread, cheesecake, apples, streusel, caramel sauce... there's a reason I adapted this recipe to a 9-inch pan from its original 9x13... I knew I would be likely to eat the WHOLE.THING.

We took these to a friend's house and they were a huge hit. And there's no question why. Everyone will love to eat them, but I also loved that I could make all the layers in my food processor, dirtying only one bowl! (Except the apples. Don't put the apples in the food processor!)

If you don't have a food processor, don't worry. You can just whip up the layers in a regular bowl using a pastry blender or your fingers. The original post that gives directions without a food processor is also linked below, if you're interested.

However, don't worry about the method of preparation here. Just go out, buy the ingredients, and get these made. And eaten.


Find more great ideas at Inspire Me, Fabulous, Hearth and Soul, Full Plate, Favorite Things, Wow Me, Wonderful Wednesday, Wine'd Down.


Caramel Apple Cheesecake Bars

Crust:
1 cup flour
1/4 cup brown sugar
1/8 tsp. salt
1/4 tsp. cinnamon
1/2 cup butter, cut into cubes

Apples:
3 medium baking apples, peeled, cored and finely chopped
2 Tbsp. sugar
1/2 tsp. cinnamon
1/4 tsp. nutmeg

Filling:
1-8 oz. package cream cheese, softened
1/4 cup sugar
1 large eggs
1/2 tsp. vanilla extract

Topping:
1/2 cup brown sugar
1/2 cup flour
1/4 teaspoon cinnamon
1/2 cup oats
4 ounces butter, cold, cut into cubes

1/2 cup your favorite caramel topping

For the crust, in the bowl of your food processor, combine the flour, brown sugar, salt and cinnamon. Pulse to mix well. Add the butter, and pulse until mixture is crumbly. Press the crust evenly into a greased 9" pan. Bake at 350 for 10-13 minutes or until very lightly browned around the edges.

For the topping, combine brown sugar, flour, cinnamon and oats in the food processor and pulse just to mix. Add the butter and pulse until crumbly. Set aside.

For the filling, combine the cream cheese and sugar in the food processor and pulse until smooth. Add the egg and vanilla and pulse until well combined. Pour over the warm crust.

For the apples, in a small bowl, stir together the chopped apples, sugar, cinnamon, and nutmeg. Spoon over the cheesecake layer. Sprinkle the streusel topping over the apples. Bake for 35-40 minutes until the filling is set.

Cool the bars to room temperature or refrigerate overnight for best results. Drizzle with the caramel topping.

Recipe Source: Adapted from Mel's Kitchen Cafe

Monday, October 28, 2019

Sausage and Tortellini Soup


This is the perfect soup for these fall days. Even though I just made it yesterday, I wanted to post it as soon as possible so you could make it immediately! I think this would be especially good to warm up the tummies of your little trick or treaters before they head out on Thursday.


This soup comes together quickly thanks to refrigerated tortellini. And it's chock full of carrots and spinach, so you will feel good about serving a well-rounded dinner. Meat, dairy, vegetables, starch - this soup has everything and is super tasty to boot! Normally I serve salad and bread with soup but in this case, we ate the soup solo - and everyone was satisfied.


This sausage and tortellini soup was a dinner winner in my family; two people had seconds, and the other two took the leftovers for lunch! (Wait, that's today, that's my lunch TODAY! Woo hoo!)


Get more great ideas at Inspire Me, Fabulous, Hearth and Soul, Wine'd Down, Wonderful Wednesday, Favorite Things,


Sausage and Tortellini Soup

1 pound Italian sausage
1 tsp. olive oil
1 small yellow or white onion, diced
2 cups peeled and diced carrots (I use baby carrots and just slice thickly)
4 garlic cloves, minced
1/4 cup flour
5 cups chicken broth
14 oz. refrigerated cheese tortellini
1 tsp. salt
1/2 tsp. pepper
1/2 tsp. Italian seasoning
6 ounces baby spinach, chopped
2 cups half & half
1/2 cup shredded Parmesan cheese


In a large stockpot set over medium-high, cook the sausage until browned. Remove the cooked sausage to a paper towel lined plate; set aside.

Add olive oil to the pot, then saute onion and carrots for 5 minutes or until the vegetables are soft. Add the garlic and sauté for an additional 2 minutes, or until fragrant, stirring occasionally to prevent it from burning.

Whisk in the flour and cook for 1 minute. Gradually add in the chicken broth, and stir to combine. Continue cooking until the mixture reaches a simmer, then reduce heat to medium-low and simmer for 6 minutes.

Add the sausage, tortellini, salt, pepper and Italian seasoning to the pot. Simmer for 3 minutes, then add the spinach and half and half, stirring until the spinach is wilted and the tortellini is fully cooked.

Serve immediately and top with shredded Parmesan cheese.

Recipe Source: Adapted from Life Made Simple Bakes

Tuesday, October 15, 2019

Shrimp, Corn and Bacon Risotto {Instant Pot!}


You know that risotto is my favorite thing to cook in the Instant Pot. It comes out beautifully every time, with minimal effort, and without having to add cream. So I am always on the lookout for new combinations. This one, with shrimp, bacon and corn, is a wonderful combo. If you wanted to get super fancy, you could grill the corn and shrimp first for even more flavor and color, but my family adored this dish just as written.


It's the perfect comfort food with summery flavors - great for a transitional season like this. (Work with me here, I'm still trying to transition away from summer, even though I'm wearing flannel pjs to bed...TMI.) So, all that to say, make this risotto. You won't be sorry.

Find more great ideas at Inspire Me, Inspire Me 2, Fabulous, Hearth and Soul.


Shrimp, Corn and Bacon Risotto

4 slices bacon, chopped
1/2 medium onion, finely chopped
1/2 medium red bell pepper, finely chopped
4 cloves garlic, minced
1 1/2 cups Arborio rice
1/4 cup dry white wine
3 1/2 cups chicken broth
1 1/2 cups frozen corn kernels, thawed
12 oz bag frozen cooked shrimp, thawed
1/2 cup shredded Parmesan cheese

Turn the Instant Pot to the saute setting. Add the chopped bacon and cook and stir until cooked through but not too crispy. Remove the bacon with a slotted spoon to a paper-towel lined plate. Add the onion, red pepper and garlic to the bacon drippings in the pot. Cook and stir for 3-5 minutes until the vegetables are tender. Add salt and pepper to taste. Add the rice and cook and stir for 2 minutes until the rice is slightly browned. Add the wine to the pot to deglaze. (Scrape the bottom of the pot to get any bits off!)

Add the chicken broth, stir all the ingredients together, then cover the pot. Set on high pressure for 6 minutes. When the cycle is complete, do a quick release of the pressure.

Stir in the shrimp and corn and the Parmesan cheese and stir well to incorporate all the ingredients. Adjust the salt and pepper to your taste. Serves 6.

Recipe Source: Adapted for the Instant Pot from the original recipe at From a Chef's Kitchen

Monday, September 2, 2019

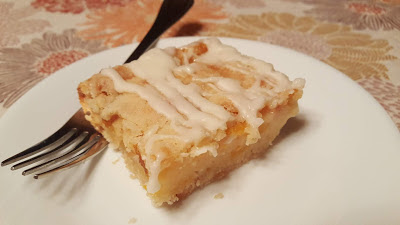
Peach Cobbler Bars


We have really been enjoying the fruit this summer. But sometimes I buy more than we can eat in a reasonable amount of time. Surely I'm not the only one?

So, when that happens, I gladly turn the fruit into a baked good; or a baked GREAT. This was definitely a baked GREAT.


All the goodness of peach cobbler baked into a bar form, then covered with a delectable almond icing. This was the perfect dessert for Labor Day weekend, reminding us that summer is not over til September 21, people! But even if it feels more like fall, you will love the summer flavors in this dessert.


Find more great ideas at Inspire Me Monday, Inspire Me Monday 2, Fabulous, Hearth and Soul, Twinkly Tuesday.


Peach Cobbler Bars

Crust:
1 1/2 cups flour
3/4 cup cold butter, cubed
1/8 tsp. salt
1/2 cup sugar

Filling:
2 eggs
1/3 cup flour
1 cup sugar
1/2 cup sour cream
1/8 tsp. salt
2-3 cups peaches, peeled and finely diced

Almond Icing:
1 cup powdered sugar
5 Tbsp. heavy whipping cream
1 tsp. almond extract

For the crust, stir flour, salt and sugar together. Add butter and cut in with a pastry blender, two knives or your fingers until mixture resembles coarse sand. (Alternatively, combine flour, salt and sugar in the bowl of your food processor. Add the cubed butter and pulse until the mixture resembles coarse sand. You want to see some pieces of butter in the mixture.)

Reserve 1 cup crumbs.

Pour remaining crumbs into a greased 9x13 baking dish and press down firmly. Bake at 350° for 15 minutes.

While the crust is baking, prepare the filling. Whisk eggs, flour, sugar, sour cream and salt together. Fold in the peaches.

Pour peach mixture over top of baked crust layer. Sprinkle filling layer with remaining cup of crumbs. Bake at 350° for 1 hour or until set.

For the icing, combine the powdered sugar, cream and almond extract and stir with a spoon or whisk until smooth. After bars have cooled for 1/2 hour, drizzle top with the icing. Serve warm or at room temperature. Refrigerate leftovers.

Recipe Source: Can't Stay Out of the Kitchen

Monday, August 26, 2019

Fresh Strawberry Bread


The days are getting cooler, and everyone in our house is back to school, but I still want to hang on to summer! I need more lunches on the patio, dinners on the deck, time in the kayak, reading by the lake, getting into a sun baked car.... (am I the only one who loves getting into a HOT car? probably.)

Luckily, you can feel like it's still summer (and technically it IS!) with a delicious quick bread like this one. Strawberries are THE fruit of summer, and they are delicious baked up in this bread.


So wear your sunglasses and tank top and get this bread baking! And relish these last days of summer.

Get more great ideas at Hearth and Soul, Fabulous, Inspire Me, Inspire Me 2.

Fresh Strawberry Bread

2 1/2 cups flour
1 cup sugar
3 1/2 tsp. baking powder
1 tsp. salt
3 Tbsp. vegetable oil
1 cup milk
1 egg
1 tsp. vanilla
1 1/2 cups fresh sliced strawberries

Combine the flour, sugar, baking powder and salt in a large mixing bowl. Add in the oil, milk egg and vanilla and stir with a wooden spoon until combined. Fold in strawberries.

Pour into a greased loaf pan. Bake at 350 for 65-80 minutes or until top is golden brown and a toothpick inserted near the center comes out clean.

Cool slightly, then loosen sides of loaf from pan and remove to wire rack to cool completely.

Recipe Source: Adapted from Lemon Tree Dwelling

Monday, August 19, 2019

Strawberry Rhubarb Cheesecake Bars


Strawberry Rhubarb is such a wonderful summer combination. I loved this treatment of the tangy and sweet fruit, layered between cream cheese and streusel.

It was a big hit at a summer picnic, with even kids requesting seconds!


Because of the several layers, this does take a little time to come together, and it's really best if you can let it sit overnight in the fridge before serving. It will be worth the wait!

Strawberry Rhubarb Cheesecake Bars

Crust and filling:
1/2 cup butter, softened
1/4 cup brown sugar
1 tsp. vanilla, divided
1 cup flour
1/2 tsp. salt
8 oz. package cream cheese, softened
1/2 cup, divided
1 egg
1 1/2 cups diced fresh rhubarb
1 cup fresh strawberries (about 10-11 strawberries), hulled and diced
1 tsp. cornstarch
1/4 teaspoon cinnamon
1 Tbsp. lemon juice

Topping:
1/2 cup all-purpose flour
1/2 cup brown sugar
1/2 cup oats
1/4 tsp. salt
1/4 cup butter, cold and diced

For the crust, combine butter and brown sugar using an electric mixer until creamy. Mix in 1/2 tsp. vanilla. In a small mixing bowl, whisk the flour and salt together. With the mixer on low speed, slowly add the flour mixture to the butter mixture and mix until combined. Press the dough evenly into a greased 8 or 9" baking pan. Bake at 350 for 12 minutes or until lightly browned. Set aside to cool.

For the filling, combine cream cheese and 1/4 cup sugar and beat together until smooth. Add the egg and 1/2 tsp. vanilla, and mix until combined. Pour over the partially-baked crust and spread evenly. In a medium bowl, stir together rhubarb, strawberries, 1/4 cup sugar, cornstarch, cinnamon, and lemon juice. Sprinkle evenly over cream cheese filling.

For the topping, combine flour, brown sugar, oats, and salt. Cut in the cold butter with a pastry blender until you have a pea-sized crumb-like mixture. Sprinkle topping over the fruit mixture. Bake again for 40-45 minutes or until filling is set. Cool completely on a wire rack. For best results, refrigerate for several hours or overnight before cutting into squares and serving. Refrigerate any leftovers.

Recipe Source: Adapted from Smorgaseats

Monday, July 8, 2019

Sticky Chicken with Pineapple Salsa


If you're anything like me, you're always looking for new recipes. For some reason, I am always looking for new chicken recipes! I have a lot that are family favorites, but chicken is so versatile that it's fun to find new treatments for it.

This sticky chicken is a great new way to prepare chicken, and the summery salsa that accompanies it puts it over the top. The chicken would be great on its own, but it's especially flavorful when paired with this pineapple salsa. It's a great summer meal, and you could easily grill the chicken instead of roasting it to save from turning on the heat in your kitchen.

This new recipe won rave reviews from everyone in my family. We loved it paired with rice pilaf and roasted broccoli.

Check out these other family favorite chicken recipes: BBQ Chicken and Grilled Pineapple Quesadillas, Chicken and Brie Flatbread, Chicken and Mushroom Stuffed Shells, Chicken and Vegetable Strudel, Chicken Lettuce Wraps, Chicken Marsala, Teriyaki Chicken, Island Chicken, Creamy Tuscan Chicken.


Sticky Chicken with Pineapple Salsa

Chicken:
1 pound boneless,skinless chicken thighs
1 pound chicken drumsticks
1/2 tsp. salt
1/2 tsp. pepper
1/2 tsp. garlic powder
1/4 cup honey
2 Tbsp. soy sauce
1 Tbsp. brown sugar
2 tsp. apple cider vinegar

Salsa:
1 1/2 cups pineapple chunks
1/4 cup finely chopped red onion
1/4 cup chopped cilantro
1 lime, juiced
pinch of salt and pepper

For the salsa, combine the pineapple chunks, onion, cilantro, lime juice and salt and pepper in a bowl and stir well. Refrigerate until ready to use. (Can be made 1 day ahead.)

For the chicken, line a sheet pan with foil and spray the foil with nonstick spray. Place the chicken thighs and drumsticks on the pan and sprinkle with salt, pepper and garlic powder on both sides.

In a bowl, whisk together the honey, soy sauce, sugar and vinegar. Brush one layer of sauce on the chicken, then roast the chicken at 425 for 20 minutes. After 20 minutes, brush on more of the sauce and roast for 10 more minutes. Brush or spoon on any remaining sauce and roast for 15 more minutes, or until the inside temperature registers at 165 degrees.

Remove the chicken and serve immediately with the pineapple salsa. Serves 6.

Recipe Source: Adapted from How Sweet Eats

Monday, July 1, 2019

Cheesy Taco Pasta


Here's an easy, delicious, fast, one-pot dinner that will have your tastebuds singing. It's perfect for these summer evenings when you're running from one activity to another and your little soccer players need a good supper!


It's also perfect for a rainy summer day when comfort food is in order. Or any day that ends in "y" for that matter. This recipe takes all the good flavors of tacos (too many to name here, honestly) and combines them with pasta in a cheesy, tomato-y sauce.

This won rave reviews at my house, especially when topped with sour cream and guac. (As would anything.)


Cheesy Taco Pasta

3 cups small shell pasta
1 pound ground beef
1/2 cup onions, chopped
2 cloves garlic, minced
2 Tbsp. chili powder
1/2 tsp. garlic powder
1/2 tsp. onion powder
1/2 tsp. cayenne
1/2 tsp. oregano
1/2 tsp. paprika
2 tsp. cumin
2 tsp. salt
2 cups water
1 cup tomato sauce
1 cup shredded Mexican style cheese
fresh cilantro, guacamole, sour cream, tomatoes, olives for garnish as desired


Cook ground beef, onions and garlic in a large skillet over medium high heat until meat is no longer pink; drain fat. Stir in the tomato sauce, chili powder, garlic powder, cayenne, oregano, paprika, cumin, salt, water and pasta.

Loosely cover the pan, reduce heat to medium.

Cook for 5-10 minutes until the pasta is done, stirring occasionally.

Remove from heat and stir in cheese. Serve with additional garnishes as you like. Makes 4-6 servings.

Monday, June 3, 2019

Banh Mi Tacos


If you're like me, you love combining different food styles. I think fancy people call that "fusion." This is a great example of a Mexican and Vietnamese fusion - carnitas in flour tortillas are topped with pickled vegetables and a spicy sauce, replicating the famous Banh Mi sandwiches. These were so delicious that I'm making them again tonight. I love getting plenty of vegetables in a taco...and I love the combination of crunchy pickled vegetables with the spicy meat and sauce.


These flavors work best when they've had time to mingle, so try to make the sauce and veggies the morning of, or the night before.

I also added avocado as I thought, what's a taco without avocado? You can certainly omit to be more authentic. Or add other things to be even "more fusion."


Whatever you do, get these great Banh Mi tacos on your dinner rotation STAT!

Banh Mi Tacos

Tacos:
8 Flour tortillas
2-3 cups Carnitas
1 avocado, sliced

Sauce:
1 cup sour cream or Greek yogurt
2 Tbsp. lime juice
1 Tbsp. chili garlic sauce
2 Tbsp. sweet Thai chili sauce

Pickled Vegetables:
2 large carrots, peeled and cut into thin matchsticks
1 English/seedless cucumber, cut into thin matchsticks
1/2 red onion, thinly sliced
2 Tbsp. sugar
2 Tbsp. rice vinegar
1 tsp. sesame oil
1/2 tsp. coarse salt

For the sauce, whisk together the sour cream, lime juice, chili garlic sauce and sweet Thai chili sauce. Store covered in the refrigerator for up to 2 days prior to serving.

For the pickled vegetables, place the carrots and cucumber in a bowl. Place the onion in a second bowl. Whisk together the sugar, vinegar, sesame oil and salt. Pour over the vegetables in each bowl and toss to coat well. Cover and refrigerate for several hours, ideally.

Warm the tortillas in the microwave or in a hot skillet on the stove top. Fill with carnitas, avocado slices and pickled vegetables, then top with the sauce. Serves 4.

Monday, May 6, 2019

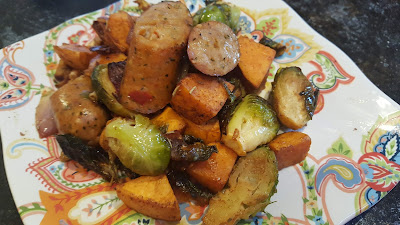
Sweet Potato, Brussels Sprouts and Chicken Sausage Sheet Pan Dinner


Well, after that celebration of 10 years of recipes, it's time to get started posting new ones again. We're trying to eat a bit healthier around our house as of late (it's an uphill battle, isn't it?) so I won't have many baked goods to share for awhile, but I have several amazing main meals just waiting for the spotlight.


This Sheet Pan dinner featuring chicken sausage, sweet potatoes and brussels is just one of those main meals!

I love the ease of sheet pan dinners and this one is wonderful. I'm sure that this would be more suitable in the fall, when brussels are in season and when we are eating more sweet potatoes, but sometimes the desire to try a new, fast, easy, delicious dinner trumps seasonality. I think there would be several good varieties of chicken sausage to choose from (flavor wise) when making this, but I liked Italian style. They had just enough kick to complement the herbs and spices in the veggies. And you can always make this milder by leaving out the cayenne.


Do yourself a favor and make this great (and easy! so easy!) dinner as soon as possible.


Sweet Potato, Brussels Sprouts and Chicken Sausage Sheet Pan Dinner

1 (12 oz) package Chicken Sausage
2 tsp. olive oil
1 pound Brussels sprouts, sliced in half
2 large sweet potatoes, peeled and cut into 1" cubes
1 large red onion, cut into quarters vertically
1 Tbsp. garlic, minced (3 cloves)
1 tsp. dry mustard powder
1 tsp. smoked paprika
2 Tbsp. brown sugar
1/4 tsp. cayenne pepper
1/2 tsp. kosher salt
1/2 tsp. freshly ground black pepper
1/2 tsp. rosemary

In a large mixing bowl, combine the prepared sprouts, onion and potatoes. Drizzle oil over, add minced garlic and toss to coat. Combine the mustard powder, paprika, brown sugar, cayenne, salt, pepper and rosemary, and then sprinkle over the vegetables and stir well so that everything is coated.

Transfer vegetables to a large sheet pan. Roast at 425 for 15 minutes. Cut each sausage link into thirds, and then add to the pan. Roast for an additional 10 minutes. Serves 4.
Powered by Blogger.