Monday, June 7, 2010

Rosemary Roasted New Potatoes


I love roasted new potatoes. After much trial and error, I think I've figured out how to get them close to perfect - with a tender, soft inside and a nice, crunchy outside. And I'm delighted to share the "secret" with you. As with other potato recipes, I'm not going to give strict measurements, because it will depend on how much you're making. This is an easy one to eyeball, and a difficult one to screw up.

Start by scrubbing the potatoes gently under cold water, then cut them in quarters.


Put the potatoes in a saucepan and cover with water. Cover the saucepan, and bring to a boil over medium high heat. Once it's boiling, reduce the heat so you don't get potato water all over your stove (experience is the greatest teacher!) and let the potatoes simmer for about 8 minutes.

While the potatoes are cooking, you can prepare the herb mixture. Feel free to use whatever you want. I use an herbed garlic salt and rosemary. I combine them in my mortar bowl,


then I go to town crushing it with the pestle. When the potatoes are fork-tender but not mushy, drain them then return them to the saucepan. Drizzle with olive oil


then stir well to coat all the potatoes. Transfer to a rimmed baking sheet, then sprinkle with your herb mixture.


Roast at 425 for about 20-30 minutes, stirring every 10 minutes.


See that beautiful color - you can just tell there's going to be a delicious crunchy shell!

If you need to roast these at a higher or lower temperature to match meat that you're roasting, that's ok. It will just take more or less time, depending. These potatoes go well with any kind of meat, but I especially like them with grilled rubbed pork tenderloin, grilled steak and chicken kebabs.

There are more great recipes at Seasonal Sunday, Mouthwatering Monday, Tempt my Tummy Tuesday, Tuesdays at the Table and Tasty Tuesday.

Thursday, June 3, 2010

Pasta with Asparagus and Bacon


This is a really great recipe for using one of my favorite spring vegetables - asparagus. The smokiness of the bacon compliments the vegetable well, and the creamy pasta sauce ties it all together. Plus, you could have dinner on the table in a half hour!

Start by cooking the pasta til al dente. While it cooks, wash the asparagus, then break off the tough ends and chop it coarsely.


Bring 2 cups of water to a boil in a large saucepan. Add the asparagus,


and boil for 2 minutes. Watch the clock! You don't want the asparagus getting mushy! Remove from the heat and drain the asparagus, then put it in ice water to stop it from cooking any more.


Now, fry up the bacon in the same skillet. When a recipe calls for bacon to be cooked and then crumbled, I prefer to cut it first. I just use my kitchen shears to cut multiple slices into pieces.


Although they stick together initially, as they cook they'll come apart.


Fry the bacon until it is crisp, and then remove from the skillet to drain on a paper-towel lined plate.

Drain the grease from the pan, then heat the butter and olive oil in the same skillet over medium heat. Add the minced garlic, and cook until it is fragrant, about 2 minutes. Slowly add the half and half,


bring to a boil, then reduce the heat and let simmer for 2 to 3 minutes or until slightly thickened. Add the mozzarella cheese,


and stir until it is melted. Drain the pasta and add it to the sauce,


along with the salt, asparagus


and bacon.


This looks good already!


Now stir it all up so the sauce is coating everything, and top with the Parmesan cheese.


If you have fresh parsley, it makes a lovely garnish. If not, it's delicious, and beautiful, even without it!

Get more inspiration at Cooking Thursday , Krazy Kitchen, Foodie Friday, Friday Food , Food on Fridays, Seasonal Sundays.

Pasta with Asparagus and Bacon

12 oz. rigatoni, rotini or other large pasta
1 pound fresh asparagus, trimmed and coarsely chopped
8 bacon strips
1 garlic clove, minced
2 Tbsp. butter
1 Tbsp. olive oil
1 cup half and half
1/2 cup shredded mozzarella cheese
3/4 tsp. salt
1/3 cup grated Parmesan cheese
minced fresh parsley for garnish

Cook pasta according to package directions.

Meanwhile, in a large skillet, bring 2 cups of water to a boil. Add asparagus, cover and boil for 2 minutes. Drain and immediately place in ice water. Drain and pat dry.

In the same skillet, cook bacon over medium heat until crisp. Remove to paper towels to drain. Crumble bacon and set aside. Saute garlic in butter and oil until tender. Stir in half and half; bring to a boil. Reduce heat; simmer, uncovered for 3-4 minutes until slightly thickened.

Stir in mozzarella cheese until melted. Drain pasta and add to pan. Stir in salt, asparagus and bacon. Sprinkle with Parmesan cheese and parsley. Serves 6-8.

Tuesday, June 1, 2010

Cherry Oatmeal Muffins


Sesame Street had the cookie monster. I am a self-professed muffin monster. I love muffins. Especially when they're loaded with good stuff like oatmeal and cherries! I love cherries! When it's cherry season, I have been known to make myself sick eating too many in one sitting. So I was delighted to find this recipe using frozen cherries. This new recipe rocketed up to one of my all time favorites for muffins.

Not only are these muffins super delicious and nutritious, but they come together super fast, without using an appliance - a plain old wooden spoon works fine on these.

Start by combining the flour, oats, brown sugar


baking powder, and salt in a large bowl. Stir to combine. In a large measuring cup, combine the buttermilk, egg and oil. Add the liquid to the oat mixture,


and stir just until the dry ingredients are moistened. The batter will be a little lumpy - that's ok! Drain the thawed cherries (mine were still a tad bit frozen, they'll still work!) and cut them into quarters.


Fold the cherries into the batter, then spoon the batter into 12 paper-lined muffin cups.


Bake for 20-22 minutes or until golden. Cool on a wire rack.

And join me in muffin monster-ness!

There are more great recipes at Tempt my Tummy Tuesday, Tasty Tuesday and Tuesday at the Table .

Cherry Oatmeal Muffins

1 cup flour
1 1/4 quick cooking oats
3/4 cup brown sugar
1 1/2 tsp. baking powder
1/2 tsp. salt
3/4 cup buttermilk
1/2 cup oil
1 egg, lightly beaten
1 cup frozen tart cherries, thawed, drained and quartered

In a large bowl, stir together the flour, oats, brown sugar, baking powder and salt. In a large measuring cup, combing the buttermilk, oil and egg.

Add egg mixture to the flour mixture and stir just until moistened. The batter will be lumpy. Fold in the cherries. Spoon batter into 12 paper-lined muffin cups.

Bake at 400 degrees for 20-22 minutes or until golden. Remove from pans to a wire rack to cool. Makes 12 muffins.

Thursday, May 27, 2010

Coconut Macadamia Triangles


These delightful little treats come to us courtesy of Mel at My Kitchen Cafe. She's got a lot of wonderful recipes and she had tagged this as one of her top "sugar rush" choices. Since these bars combine some of my favorite things, I knew I had to try them!

These are deliciously chewy, crunchy, sweet and salty. I loved them!

Start by preparing the pan - you'll need a large piece of foil to line a 9" pan and have "handles" hanging over the edge. Then, lightly grease the foil, or use cooking spray.


Next, the crust. Combine the flour, brown sugar and salt (see recipe for exact quantities!) and then cut in the butter. My new favorite way to do this is with the food processor!


Press the crust mixture into the prepared pan.


Bake for about 10 minutes until the crust edges are golden.

Now, make the topping. Combine the remaining flour, brown sugar,


salt, corn syrup,


egg and vanilla.


Stir well with a wooden spoon to combine all the ingredients, then add the coconut.


Chop the macadamia nuts, then toast them in a skillet over medium heat until they're golden.


Add the nuts to the batter, stir well, then spread over the crust.


Bake for 15-20 minutes or until the topping is lightly browned and the edges pull away from the sides of the pan. Cool completely on a wire rack. Do not get impatient - these bars need to completely cool before you cut them otherwise they won't set up properly!

When they're cool, lift them out of the pan with the foil handles.


Remove the foil completely, and cut the bars (on a cutting board!)into 4 equal rows.


Cut them again in three rows, then cut each rectangular piece in half to make triangles.


Melt the chocolate, then dip each corner of the triangles in the chocolate.


Lay the bars on waxed paper to dry the chocolate completely.


Store in an air-tight container, or just eat them right off the wax paper!

Get more ideas at Cooking Thursday, Friday Food, Foodie Friday, Food on Fridays and Would you Like Chocolate with That?

Coconut Macadamia Triangles

1 cup plus 2 tablespoons all-purpose flour, divided
3/4 cup brown sugar, plus 1 tablespoon, divided
3/4 tsp. salt, divided
5 Tbsp. cold butter, cut into small pieces
2 Tbsp. light corn syrup
1 tsp. vanilla extract
1 egg
1 cup macadamia nuts, lightly toasted and coarsely chopped
1/2 cup shredded coconut
3 ounces semisweet chocolate, melted

Line the bottom and sides of a 9-inch square pan with aluminum foil, letting the edges hang over the pan slightly. Grease the foil or use nonstick cooking spray.

Combine 1 cup flour, 1 Tbsp. brown sugar and 1/2 teaspoon salt in a bowl and stir together to combine. Scatter butter pieces over the flour mixture and using a pastry blender or two knives or your fingers, cut in the butter until small crumbs form. (Alternatively, you can use a food processor to do this.) Turn the crust mixture out into the prepared pan. Press the mixture into the pan in an even, solid layer.

Bake at 375 until the edges are golden, about 10 minutes.

Meanwhile, combine 2 Tbsp. flour, 3/4 cup brown sugar, corn syrup, vanilla, egg and 1/4 teaspoon salt. Beat with a wooden spoon until thoroughly blended. Stir in the nuts and coconut until blended.

Spread the coconut topping over the warm baked bottom crust. Return to the oven and bake until the topping is lightly browned and the edges pull away from the sides of the pan, about 15-20 minutes. Let cool completely in the pan on a wire rack. Cut into twelve 3 by 2 1/4-inch rectangles. Cut each rectangle in half on the diagonal to make triangles. Dip one corner of each triangle in the melted chocolate and let cool on a sheet of waxed paper. Makes 24 bars.

Tuesday, May 25, 2010

Almond Pear Coffee Cake


This is probably the fanciest coffee cake I've ever made! It has several layers which, although takes a little more concentration to keep it all straight, makes you think it came from a bakery! But it's better, because you made it yourself. And it's delicious - it won rave reviews when I brought it to work. The original recipe called for walnuts. I substituted almonds because that's what I prefer, so use whatever you like, and whatever you have on hand.

Start by toasting the nuts. Since I was heating up the oven anyway, I just did this by placing the raw almonds on a cookie sheet and putting in the oven for about 8 minutes. Check them often so they don't burn, and give them a stir about half way through.


Then peel, core and slice the pears,


and drizzle them with the lemon juice.


After the almonds cool a bit, chop them up, then combine 3/4 cup of them with the brown sugar and cinnamon.


Set the nut mixture aside, then combine the flour and butter in another small bowl. Cut in with a pastry blender or your fingers until the mixture resembles coarse crumbs, then add 3/4 cup of the nut/sugar mixture.


Let's recap all our "parts" - a topping mixture (the flour/butter/nuts), the nut/sugar mixture, and still some plain almonds. Now let's make the cake.

Cream together the butter and sugar. Then add eggs, one at a time, beating well after each addition.


Beat in vanilla. In a small bowl, combine the flour, baking powder, baking soda and salt, and add it to the creamed mixture alternately with the sour cream.


Now, we're ready to assemble the cake! Grease a springform pan, then spread 2/3 of the cake batter in the pan.


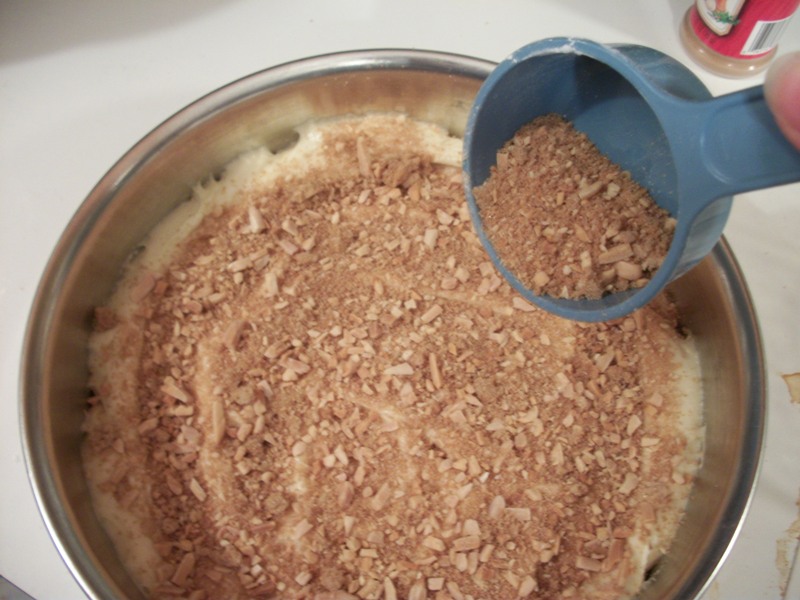
Top with the reserved nut/sugar mixture,


then layer the pears on top of the nuts.


Top with the remaining batter,


then sprinkle on the remaining toasted nuts.


Finally, top with the flour/butter/nut mixture.


Bake the cake for 50-55 minutes or until a toothpick comes out clean. Cool on a wire rack for 10 minutes,


then carefully run a knife around the inside edge of the pan to loosen the cake.


Remove the sides of the pan, and then cool for at least one hour on a wire rack.


You can freeze this cake whole, or wrap individual slices to freeze.

Get more recipes at Tempt my Tummy Tuesday, Tasty Tuesday and Tuesdays at the Table, Food on Friday.

Almond Pear Coffee Cake

Nut mixture and topping:
1 cup toasted, chopped almonds, divided
1/3 cup brown sugar
1 tsp. cinnamon
1/3 cup flour
1/4 cup cold butter

Filling:
2 medium pears, peeled and sliced (2 cups)
2 tsp. lemon juice
1/2 cup butter, softened
1 cup sugar
2 eggs
1 tsp. vanilla
1 3/4 cup flour
3/4 tsp. baking powder
1/2 tsp. baking soda
1/4 tsp. salt
1 cup sour cream

In a small bowl, combine 3/4 cup almonds, brown sugar and cinnamon; set aside. In another small bowl, combine flour and cold butter; cut in butter until mixture resembles coarse crumbs. Stir in 3/4 cup of the nut/sugar mixture; set aside for topping. Set aside remaining nut mixture for assembly.

Toss pears with lemon juice, set aside. In a mixing bowl, cream together the butter and sugar. Add eggs, one a time, beating well after each addition. Beat in vanilla. Combine flour, baking powder, baking soda and salt; add to the creamed mixture alternately with the sour cream.

Spread 2/3 of batter in a greased springform pan. Top with reserved nut mixture (not the one mixed in with the flour and butter), pears and remaining batter. Sprinkle with the other 1/4 cup of almonds and the reserved topping mixture (the nuts mixed in with the flour and butter).

Bake at 350 for 50-55 minutes or until a toothpick inserted near the center comes out clean. Cool on a wire rack for 10 minutes. Carefully run a knife around the edge of pan to loosen; remove sides of pan. Cool for 1 hour before cutting. Serves 12.
Powered by Blogger.