Monday, October 2, 2017

French Silk Brownie Dessert


I love watching the Great British Baking Show. It is amazing what those home bakers can do and the creations they present to the judges. I always end up feeling a little inadequate. I'm not particularly clever with my "bakes" and I certainly don't do any 3-D sculptures of baked goods. However, then I quickly remember that it doesn't have to be fancy to be delicious. And shortcuts are sometimes just as good as doing it the long way. That is particularly true for this recipe.

You start with a boxed brownie mix, which is fine on its own, but is truly decadent when topped with a french silk layer and additional cream. And there's garnish! Maybe there's hope for me on the Great British Baking Show after all.


Find more inspiration at Create Link Inspire, Fabulous, Show and Share, Hearth and Soul, Wow Me, Wow Us, Foodie Friday, Weekend Potluck.

French Silk Brownie Dessert

1 box brownie mix, plus ingredients to make the brownies (usually 2 eggs, vegetable oil and water)
4 ounces semi-sweet baking chocolate, plus more for garnish
8 ounces cream cheese, softened (low fat is fine)
16 ounces (2 – 8 ounce tubs) Cool Whip
1 tsp. vanilla extract

Prepare brownies as box directs, but transfer them to a 11x7 pan for baking. Make sure not to overbake so that the brownies stay fudgy.

For the french silk, melt chocolate in a large microwave safe bowl for 30 seconds, then stir, heat for 30 seconds again, then stir well, then heat on 10 second increments, stirring between each, until smooth. Let cool 5 minutes.

Beat cream cheese in a large bowl with a hand mixer until smooth. Add chocolate and mix until combined, then mix in vanilla. Fold in half of the Cool Whip (one 8 ounce container). Spread the chocolate mixture on top of the brownies, then top with second container of Cool Whip. Use a potato peeler or a microplane grater to shave some additional baking chocolate all over the top.

Chill for at least one hour before serving to allow it to set. Store in the refrigerator for up to 3 days.

Recipe Source: Adapted from Crazy for Crust

Monday, September 25, 2017

Cherry Chicken Pasta Salad


This is one of my favorite salads from the grocery deli counter. I don't buy it very often, but enjoy it at potlucks and other events when other people buy it and bring it! So I couldn't have been more thrilled when Lund's and Byerly's released the RECIPE for this salad. I knew from eating it that it wasn't complicated, but I couldn't really place the dressing. Now that I see the recipe, I feel kind of silly. It's so exceedingly simple, that dressing - just prepared poppyseed dressing and mayo!

Although late September is an odd time to be making pasta salad, the 87 degree weather makes it possible - it's just not beef stew time yet, is it? So if you need a simple lunch or dinner, or want to be the envy of everyone at the next potluck - make this salad! It's really delicious.


Find more great ideas at Inspiration Monday, Mix it Up, Busy Monday, Inspire Me, Inspire Me 2, Full Plate, Wonderful Wednesday, Foodie Friday, Weekend Potluck, Awesome Friday.

Cherry Chicken Pasta Salad

2 cups cooked, chopped chicken
12 ounces small pasta shapes (like gemelli or small shells)
3/4 cup thinly sliced celery
3/4 cup chopped red onion
1 cup dried cherries, cut in half
3/4 cups mayonnaise
3/4 cups Poppy Seed Dressing
1 tsp. salt
1/4 tsp. black pepper
Spring mix or spinach, for serving

Cook pasta in boiling salted water according to package directions. Rinse with cold water; drain.

In a large bowl, combine chicken, pasta, celery, onion and cherries.

In a large measuring cup, combine mayonnaise, poppy seed dressing, salt and pepper.

Fold 1 cup of dressing into salad, reserving the rest. Refrigerate the salad, covered, several hours or overnight.

To serve, add remaining dressing as needed. Serve on a bed of your favorite greens.

Recipe Source: Adapted from Lunds and Byerlys

Tuesday, September 19, 2017

White Chocolate Brownies


After a tumultuous August, I am glad to be back in the kitchen again, trying new recipes. These brownies seemed like the perfect thing to make after several weeks of non-stop work after a crisis. A white chocolate brownie base, drizzled with chocolate - what's not to love?


I especially appreciate recipes that can be made in one bowl; no mixer required. I really liked these after being refrigerated too, maybe just because it was summer, but I liked the texture after they were chilled. Basically, I like these on a train, in the rain, in a car both near and far. I like my white chocolate brownies, Sam I Am.


Find more inspiration at Create Link Inspire, Fabulous, Show and Share, Hearth and Soul, Wow Me, Wow Us.

White Chocolate Brownies

1/2 cup butter
6 oz white chocolate (not candy melts or white chocolate chips)
3/4 cup granulated sugar
1 tsp. vanilla
1/4 tsp. salt
2 eggs
1 1/4 cup flour
1/3 cup semi-sweet chocolate chips

Line an 8x8 inch baking pan with aluminium foil leaving an overhang on each side. Spray with non-stick cooking spray and set aside.

In a medium sized microwave-safe bowl, melt together the butter and white chocolate in short 20 second bursts. Stir the mixture after each 20 second burst.

After both the butter and white chocolate are melted, allow to cool slightly. Then whisk in sugar, vanilla, eggs and salt. Whisk together the mixture until smooth and evenly combined, then carefully fold in the flour.

Spoon the mixture into your prepared pan and bake at 350 for 20-24 minutes, or until the top is set and the sides are starting to pull away from the pan.

Allow the brownies to cool fully in the pan. Lift the brownies out of the pan using the aluminium foil edges. Carefully peel back the sides of the foil, then cut into 12 squares.

In a small bowl, melt the chocolate chips in the microwave in short 20 second bursts, stirring between each burst. Drizzle the chocolate over each square.

Recipe Source: Adapted from Just So Tasty

Monday, July 17, 2017

Double Chocolate Raspberry Pie Bars


I've had this recipe pinned for a LONG time. I finally had the perfect reason to make these - raspberries that needed to get used up, and a family gathering that called for dessert. These bars are wonderful! A simple shortbread crust is the foundation for two layers of chocolate, with a sprinkling of raspberries. The raspberries add wonderful color and break up the chocolate flavor. These are rich, so you can cut them into small pieces. They also freeze well if you want to save them for another time.

I used espresso chips for the melted chocolate layer - they added a fabulous dimension of flavor. The original recipe calls for dark chocolate chips - I think any variety would work well, so use what you have!


Take advantage of summer's great raspberries and make this delicious dessert!

Double Chocolate Raspberry Pie Bars

1 cup butter, softened
2 cups flour
1/2 cup brown sugar
1/4 teaspoon salt
1 cup chocolate chips (espresso or dark if you like)
1 cup mini semi-sweet chocolate chips
1 can (14 oz.) sweetened condensed milk
3/4 cup fresh raspberries, semi crushed

In a large bowl of a stand mixer, beat butter until creamy. Mix in brown sugar, flour and salt. Continue mixing until crumbly.

Press 1 3/4 cups of crumb mixture into a well greased 9x13" baking pan. Set remaining crumbs aside. Bake at 350 for 10 to 12 minutes or until lightly golden.

Meanwhile, in a microwave-safe bowl, combine sweetened condensed milk one cup of chocolate chips. Cook at 50% power at 1-minute intervals, stirring between each session. Cook just until melted; do not overcook or the chocolate will seize.

Remove crust from oven and pour chocolate mixture over warm crust.

Sprinkle remaining crumbs evenly over chocolate layer. Spoon raspberries over crumb mixture and top with mini chocolate chips.

Bake for 20 to 30 minutes. Let cool before cutting into bars.

Recipe Source: Adapted from Deliciously Sprinkled

Monday, June 26, 2017

Spaghetti with Sun-Dried Tomatoes, Sausage, and Spinach


We loved the flavors of the Creamy Tuscan Chicken so much that I adapted that recipe to use shrimp, and went searching for more recipes! Then last week, when one kiddo requested "some kind of spaghetti" for that evening's meal, I knew this would be perfect.

Chicken sausage, spinach and sun dried tomatoes swim in a creamy sauce with plenty of spaghetti mixed in. It is amazingly delicious. You could substitute regular Italian sausage for the chicken sausage but I am a huge chicken sausage fan... feel free to use more spinach than it calls for too - that's a great way to get more greens into your (and your family's) diet.


I hope you enjoy this dish as much as we did, and will again soon!

Find more great ideas at Inspiration Monday, Mix it Up, Busy Monday, Inspire Me, Inspire Me2, Create Link Inspire, Fabulous, Show and Share.


Spaghetti with Sun-Dried Tomatoes, Sausage, and Spinach

12 oz. spaghetti
1 Tbsp. olive oil
2 cloves garlic, minced
12 oz. cooked Italian Chicken sausage links, sliced lengthwise then crosswise into half moons
3 cups (or more) baby spinach
1/2 cup chopped sun-dried tomatoes
3/4 cup chicken broth
3/4 cup heavy cream
1/3 cup shredded Parmesan

In a large pot of salted boiling water, cook spaghetti according to package directions until al dente.

Meanwhile, in a large skillet over medium heat, heat oil. Cook garlic until fragrant, 1 minute. Add sausage, spinach, and sun-dried tomatoes and cook until sausage is browned and spinach is cooked, 3 to 5 minutes. Add chicken broth and heavy cream and bring to a simmer. Let thicken until sauce is creamy, then add spaghetti to skillet and toss until fully coated. Season with salt and pepper.

Stir in the Parmesan and serve. Makes 4-5 servings.

Recipe Source: Adapted from Delish

Tuesday, June 13, 2017

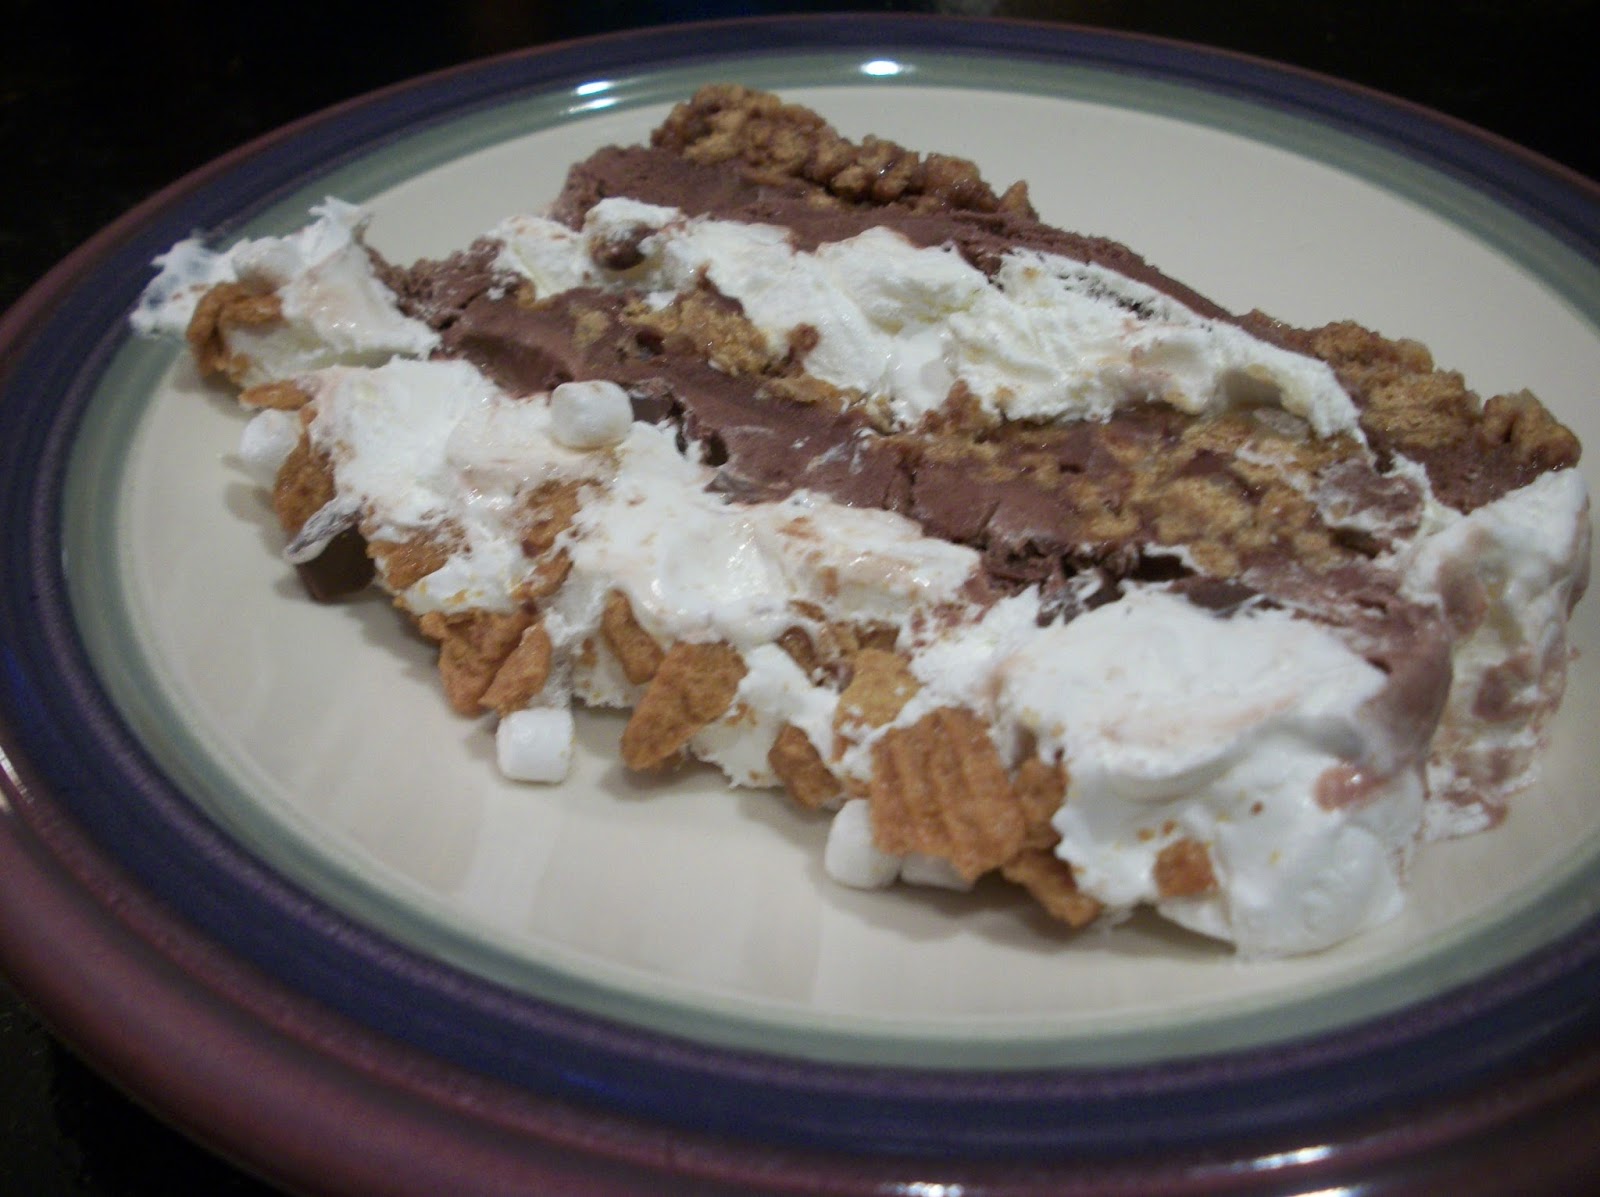
S'mores Ice Cream Cake


In my opinion, you can never have too many s'more desserts in your repertoire. This is only my third s'mores dessert, but like the other two (cookie bars and brownies), it is amazing, and it only inspires me on to make s'mores cake, cheesecake, ice cream, etc!

This is the perfect summer dessert - refreshing, delicious and impressive!

It is easy to layer up in a loaf pan,


and I loved all the textures at play - crunchy cereal, soft ice cream, squishy marshmallows, velvety chocolate pieces, and then a new discovery - marshmallow bits! They are so fun! (And they're easy to find - right by the marshmallows at my grocery.)


You'll be everyone's biggest fan when you make this ice cream cake this summer!


Find more great stuff at Inspiration Monday, Mix it Up, Busy Monday, Inspire Me, Create Link Inspire, Fabulous, Hearth and Soul, Wow Me, Wow Us, Full Plate, Recipe Sharing.

S'mores Ice Cream Cake

4 cups Honey Graham cereal, crushed
4 Tbsp. butter, melted
1 - 48 oz. container chocolate ice cream, softened
1 - 6 ounce milk chocolate bar, chopped into small chunks
1 - 8 ounce container frozen whipped topping, thawed
1 1/2 cups mini marshmallows
3/4 cup marshmallow bits

Line a 9x5-inch loaf pan with plastic wrap so that there is overhang for lifting out the cake later. Spray the plastic wrap with non-stick cooking spray.

In a large bowl, stir together the crushed cereal and melted butter until well combined. Press 1-1/2 cups of the cereal mixture into the bottom of the prepared loaf pan.

Spread half the softened chocolate ice cream over the cereal layer. Sprinkle with 1/3 of the chopped chocolate chunks.

In a large bowl, stir together the mini marshmallows and thawed whipped topping. Spread half over the top of the chocolate chunks layer. Sprinkle with 1/2 cup marshmallow bits.

Repeat the layers with 1-1/2 cups cereal, remaining chocolate ice cream, half of the remaining chocolate chunks and remaining marshmallow whipped topping mixture. Reserve the remaining marshmallow bits for the very top of the cake.

Sprinkle the remaining cereal over the marshmallow whipped topping layer. Sprinkle the remaining chocolate chunks over the cereal and then the remaining marshmallow bits over the chocolate chunks.

Cover loosely with plastic wrap. Place cake in the freezer for at least 4 hours.

When ready to serve, lift cake from the pan using the sides of the plastic wrap. Cut into slices with a large sharp knife and serve. Store leftover cake in the freezer. Serves 12.

Recipe Source: Adapted from The Baker Mama

Monday, May 22, 2017

Creamy Tuscan Chicken


Short on time but want a restaurant-quality meal on the table tonight? Then I've got you covered. This Creamy Tuscan Chicken is SO easy and SO delicious, and it's ready in a flash! You better put the pasta water on to boil before you start the chicken, otherwise you'll be waiting for the pasta!

Chicken breasts are sauteed and then covered in a creamy sauce dotted with spinach and sun dried tomatoes. The flavor is out of this world. I promise it will win rave reviews from your family, or whomever is lucky enough to eat it. I served it over egg noodles with sauteed green beans, and everyone scarfed it up. Plus, it's a beautiful presentation so would be perfect for guests.

I used some larger chicken breasts for this and then cut them in half lengthwise to get thinner portions that cook more evenly. I have also substituted a pound of large shrimp for the chicken, adding them just at the end (no earlier saute like with chicken) and it is wonderful.

So, chicken or shrimp - noodles or rice (or quinoa!)- whatever your choice, you will love this dish. In fact, I'm making it again tomorrow night. That's the sign of a winner - a weekly repeat.


Find more great ideas at Inspiration Monday, Mix it Up, Busy Monday, Inspire Me, Inspire Me 2, Create Link Inspire, Clever Chicks, Fabulous, Show and Share, Hearth and Soul, Wow Me, Wow Us, Full Plate, Recipe Sharing, Foodie Friday, Weekend Potluck, Awesome Life.

Creamy Tuscan Chicken

1 1/2 pounds boneless skinless chicken breasts, thinly sliced
2 Tbsp. olive oil
1/2 cup finely chopped onion
2 cloves garlic, minced
1 cup half and half
1/2 cup chicken broth
1 tsp. garlic powder
1 tsp. Italian seasoning
1/2 cup Parmesan cheese
3 cups spinach, chopped
1/2 cup sun dried tomatoes, chopped

In a large skillet add I Tbsp. olive oil and cook the chicken on medium high heat for 3-5 minutes on each side or until brown on each side and until no longer pink in center. Remove chicken and set aside on a plate.

Add the remaining oil to the skillet and saute and onions and garlic over medium high heat until onions are soft. Add the half and half, chicken broth, garlic powder, Italian seasoning, and Oarmesan cheese. Whisk over medium high heat until it starts to thicken. Add the spinach and sundried tomatoes and let it simmer until the spinach starts to wilt. Add the chicken back to the pan and heat through for 1-2 minutes. Serve over rice or pasta, if you like.

Recipe Source: Adapted from The Recipe Critic
Powered by Blogger.