Monday, January 31, 2022

Mushroom Wild Rice Soup


We are eating a lot of soup this year. I have my tried and true favorites that are regulars in the rotation, like butternut curry soup, shrimp and corn chowder, creamy white chicken chili, lasagna soup, sweet potato and sausage soup, and miso meatball and noodle soup, but I also like to try new ones.
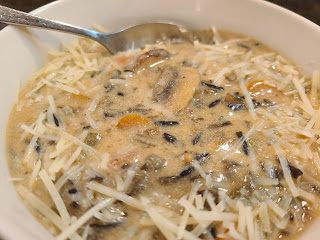
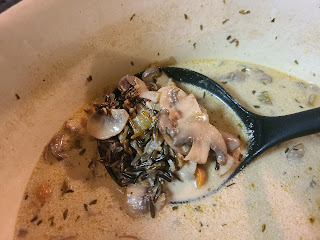
As someone who loves wild rice and mushrooms, I was sure that this would be a winning recipe. And I was right!


Chock full of two different kinds of mushrooms, as well as carrots, celery and onion, this soup is sure to warm you up on a chilly night and surprise you with its deliciousness.


It's also meatless! So if you try to eat at least one meal a week that doesn't have meat, this would fit the bill perfectly. And it's so hearty that no one will miss the traditional chicken in wild rice soup.


Because wild rice needs a long time to cook to fully open up, this soup is not a 30 minute meal. But it will be worth the wait, I promise. There's not more than 30 minutes worth of "work," but there's the simmering time.

I think this soup could be adapted quite easily for the crock pot, so if you try that, let me know how it goes!

Mushroom Wild Rice Soup

5 tsp. olive oil, divided
8 oz. baby bella mushrooms, sliced
8 oz. white button mushrooms, sliced
4 tsp. salt, divided
2 Tbsp. butter
1 large white onion, diced
4 celery stalks, ends trimmed, diced
3 medium carrots, diced
3 garlic cloves, minced
1 cup wild rice 
1 tsp. dried thyme
2 Tbsp. balsamic vinegar
1 Tbsp. Worcestershire sauce
3 cups beef broth
1 cup half and half
Freshly shredded Parmesan cheese, for serving

In a large Dutch oven or soup pot with a lid, heat 2 teaspoons of the olive oil over medium heat.

Add baby bella mushrooms and sprinkle with 1 teaspoon salt. Stir to coat and cook, stirring occasionally, until mushrooms have released their natural moisture, it has evaporated and mushrooms are browned. Remove mushrooms from pot and set aside. Repeat the browning process with another 2 teaspoons of olive oil, button mushrooms and 1 teaspoon salt. Remove from pot and set aside. 

Add the final teaspoon of oil to the pot, along with the salted butter. Add onion, celery, carrot, and final teaspoon salt, stirring to coat. Cook, stirring occasionally, until vegetables have begun to soften, about 5 minutes. If necessary, add a splash of stock to deglaze the pot and get the browned bits off the bottom. Stir in garlic, cooking until fragrant, about 1 minute more.

Add wild rice. Then, stir in thyme, balsamic vinegar and Worcestershire sauce. Stir in beef stock and bring mixture to a boil. Cover and simmer 40-60 minutes, or until rice is tender and has absorbed most of the liquid. Stir in half and half and reserved mushrooms. Top with freshly grated Parmesan cheese to serve.

For a thicker soup, make a cornstarch/water slurry and and thicken before serving. 

Recipe Source: Adapted from Kemp's

Monday, January 24, 2022

Focaccia Bread with Onions, Bacon and Smoked Gruyere


I have a few more soup recipes coming your way this winter, but first, we need some bread to go with all that soup. I especially like making focaccia bread. This is really easy if you have a bread machine that can process the dough for you. 

Focaccia is great because you can customize it to what you like, and what you have on hand. For this version, I was trying to use up some of the vast amounts of Christmas cheese... we had this wonderful smoked gruyere and I knew it would be a great topping. (I also have a previous recipe here for an herbed version and a Greek version...)


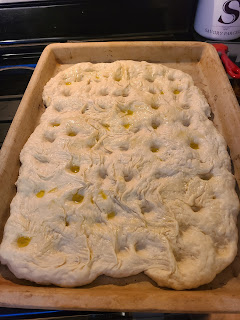
Here's a few steps to show you after your dough is processed and has risen. Spread it out into a pan (you can use a 9x13 for thicker bread - especially good if you're going to use it for sandwiches, or a "bar" pan - this one is 10x15 for a little thinner bread) then make the indents with your finger. 

Do a brief second rise, (I use my oven on bread proof setting for this) and then re-do the indents and brush with olive oil. 


Next add the toppings. For focaccia, there's really no such thing as too much topping. You want to have quite a bit to add flavor to the bread. So for this, I sauteed red onions and then added finely chopped bacon and then the cheese.


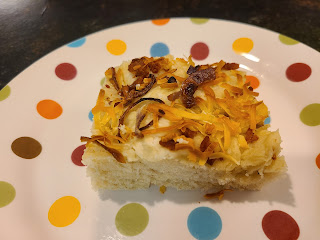
Here's the bread after it's baked.


Look at that those beautiful toppings!


This is great with soups or salad, or as a base for sandwiches. Enjoy!


Focaccia Bread with Onions, Bacon and Smoked Gruyere

3 cups flour
1 tsp. salt
2 tsp. sugar
1/3 cup olive oil
1 cup water
1 1/2 tsp. active dry yeast

1 cup thinly sliced red onion
1 cup shredded smoked Gruyere
3 slices bacon, diced
olive oil, for brushing

coarse salt 


Combine the first six ingredients in a bread machine pan in the order recommended by your bread-maker manufacturer. Set the machine for the dough setting and turn on. 

When the dough is processed, remove from the bread pan with lightly oiled hands. Press into a greased 9x13 pan or 10x15 pan and make indentations with your finger, about every inch. Cover with a damp cloth and set in a warm place to rise until doubled in size, about 30 minutes. (If your oven has a "bread proofing" setting, that is perfect.)

For the topping, saute the bacon over medium heat until crisp, then remove with a slotted spoon. If you want, you can chop it even more finely after it cools. In the same skillet, saute the onion over medium heat in the bacon grease for 8-10 minutes or until it is slightly carmelized.

After the bread has risen, remove the towel, then re-do the indentations, since they will have disappeared a bit . Brush the dough lightly with olive oil. Sprinkle with some coarse salt, then place the cooked onion over the dough. Sprinkle on the bacon, then the cheese.

Bake the bread at 400 for 20 minutes or until done.


Monday, January 10, 2022

Bean and Butternut Soup with Bacon {Crock pot}


This may seem like a good autumn soup, and it is, but it's also a good winter soup. Butternut squash are still widely available in the grocery, and baby, it's cold outside, so it's a good time to make soup. (0 degrees actual temperature here as I write this.)


This soup cooks by itself all day in the crock pot. When you come home after a long day of work, errand running, kid transporting, or what have you, all you need to do is fry up the bacon and blend the soup and a comforting, delicious, and healthy dinner is ready. 


You could definitely add some crusty bread and a big green salad for a well rounded meal. The leftovers of this soup are also delicious; I ate it for lunch for a couple days after serving it for supper. 
And it's chock full of great veggies.  If you're into sneaking in veggies for your kids' sake (ahem, I speak from experience) then this soup will do that perfectly. 

I do recommend, as the recipe states, that you soak the beans overnight. This is not a difficult step, you just have to remember to do it before you go to bed! 

But when you remember, and then make this soup, you will be rewarded by how good this is after minimal effort. 

Yay, the crock pot, one of my favorite appliance robots.


Bean and Butternut Soup with Bacon

1 pound dried Great Northern beans
4 garlic cloves, minced
1 - 12 oz. bag frozed riced cauliflower
12 to 16 oz. cubed butternut squash (frozen or fresh)
1 white onion, diced
10 cups water
2 1/2 tsp. salt
1 tsp. pepper
1 tsp. onion powder
1/2 tsp. liquid smoke
1/2 tsp. soy sauce
1/8 tsp. cayenne pepper, or to taste
6 slices thick cut bacon

Soak the beans in a large bowl, covered with water, overnight. 

The next day, drain the beans, and add them to the crock pot along with the garlic, cauliflower, squash, onion, water, salt, pepper, onion powder, liquid smoke, soy sauce and cayenne. Cover and cook on high for 6-7 hours, or on low for 12 hours.
 
Just before serving, dice up the bacon and fry until crisp. Using an immersion blender, puree the soup to your desired consistency. Keep out a little bacon for garnish, and add the rest to the soup.  Serves 6 to 8. 

Tuesday, December 28, 2021

Favorite Recipes of 2021


It's almost the New Year (seriously, how did this happen?) but before we get into more new recipes, I wanted to look back on some favorites from this past year.

As usual, every recipe I post is a favorite - I wouldn't take the time to post it if I didn't love it - but these are the recipes that have made their way into repeat rotation at our house. 

I hope you'll try a few now, or in the New Year, and I hope they become your favorites, too.

Here they are, in completely random order:

Chocolate Mint Cake


Monday, December 20, 2021

Peppermint Oreo Bon Bons


I try to include one candy recipe each Christmas baking season. I like the variety it brings to a cookie tray, and it can help fill in little gaps on said tray as well! But let's face it, the real reason, is that candy is delicious. 


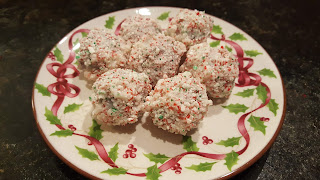
These bon bons are a cross between a candy and a cookie since they are made WITH cookies. Oreos get special treatment, combined with cream cheese, dipped in white chocolate, and then covered wiht peppermint. These are beautiful and delicious. They are also rich, so one goes a long way.


I had trouble finding red and white peppermint candies or candy canes, so these bon bons have a sprinkle of green from the striped candy canes I did find. Lesson learned - buy ingredients early in the season! So yours might be more pink and white if you use starlight candies or the traditional canes.

Merry Christmas!


Peppermint Oreo Bon Bons

36 Oreos
8 oz. cream cheese (reduced fat is fine), softened
16 oz. white chocolate melting wafers
1/2 tsp. peppermint extract
48 crushed peppermint candies or about 12 crushed candy canes

Place the cream cheese and Oreos in a food processor and process til combined. Scoop out about tablespoons of the mixture and roll into 48 balls, about 1 inch. Place them on a parchment or waxed paper lined cookie sheet. 

Freeze for 20 minutes, or until hardened.

In a microwave safe bowl, combine the wafers and the peppermint extract. Microwave for 30 seconds; stir, and then melt again for 30 seconds, until you can easily stir the mixture.

Dip each bon bon in the white chocolate mixture with a fork, roll in peppermint candies, then return to the lined cookie sheet. 

Bon Bons can be frozen. 

Monday, December 13, 2021

Eggnog Blossoms


Almost every year, I include a "blossom" cookie in my cookie baking. We are so lucky to have so many varieties of BOTH dough and kisses to choose from - it seems like there is never an end to the supply of blossom options!  In past years, we've had Cappuccino Swirls, Candy Cane Kiss Cheesecake Cookies, Triple Peppermint Cookies, Chocolate Peppermint Swirls, Macaroon Kisses, Cherry Kisses, and Chocolate Kissed Gingerbread.


All of those varieties are so good and each one has a different twist - this year's recipe is no different. This time a traditional chocolate kiss sits in an eggnog infused cookie. SO GOOD! 


The dough for these cookies needs to chill before you roll it into balls, and then in more glorious sugar. So be sure to plan for that. While it chills, you can unwrap all the kisses, wrap presents, start baking another variety of cookie, or watch your favorite show. You could even read a book!


Whatever you do, plan to make these cookies. They are a fun addition to any cookie plate, and make great gifts as well.

Eggnog Blossoms

6 Tbsp. butter, softened
1/4 cup eggnog
3/4 cup sugar
1 egg
1 tsp. baking soda
1/4 tsp. baking powder
2 cups flour
dash nutmeg
32 Hershey's kisses, unwrapped
1/3 cup sugar (additional, for rolling)

In a large mixing bowl, cream together the butter, eggnog and sugar. Add the egg and mix well. Add in the baking soda and baking powder and mix until combined. Add the flour and nutmeg, mixing until incorporated. Cover and refrigerate for at least an hour.

Roll the dough into 32 balls and roll each ball in sugar. Place 2 inches apart on a baking sheet and bake at 350 for 7-8 minutes. They will not brown but do not overbake.

Place a kiss in the center of each cookie. Allow to cool on the baking sheet for a few minutes then transfer to a wire rack to cool completely. 

Makes 32 cookies. 

Monday, December 6, 2021

Italian Ricotta Cookies


Although I am hard pressed to NOT like any Christmas cookie that I make, I think these were my favorite from last year. I had a hard time keeping my hands out of the proverbial cookie jar (or tins as it were). I especially liked these chilled - we tend to keep our cookie tins in the very cold garage.


They're great at room temp, too. They're just so delicious. The butter and ricotta combine for a texture that melts in your mouth! And the simple glaze is the icing on the cake (or the cookie). For more fun, you can top with a variety of festive sprinkles.


(You can see I put paper towels under the cooling racks to catch all the icing drips. Easy clean up!)

Since they're relatively small, you don't have to feel any guilt about eating several at a time. Not that I would know about that. This recipe also makes a lot of cookies so there are plenty to give away or to take to multiple holiday gatherings. 


I hope you enjoy these as much as I did! 


Italian Ricotta Cookies
1 cup butter, softened
1 3/4 cup sugar
2 eggs
1 - 15 oz. container ricotta cheese
2 Tbsp. vanilla
4 cups flour
1 tsp. baking powder
1 tsp. baking soda

Glaze:
1 1/2 cups powdered sugar
1 tsp. almond extract
4-5 Tbsp. milk

In a medium bowl, cream the butter and sugar. Add the eggs, ricotta cheese, and vanilla; mix until well combined. In a separate medium bowl, combine the flour, baking powder, and baking soda. Add the flour mixture to the ricotta mixture; mix well. Roll or scoop the dough into teaspoon-sized balls. Place on an ungreased cookie sheet about 2-inches apart.

Bake at 350 for 8-10 minutes or until lightly browned. Allow cookies to cool on the baking sheet for 3 minutes before transferring to a wire rack to cool completely.

In a medium bowl, whisk the milk, powdered sugar, and almond extract until smooth. Dip the tops of the cookies into the glaze and set upright back on the wire rack.

Immediately top with sprinkles. Repeat for remaining cookies.  

Makes about 5 dozen.
Powered by Blogger.